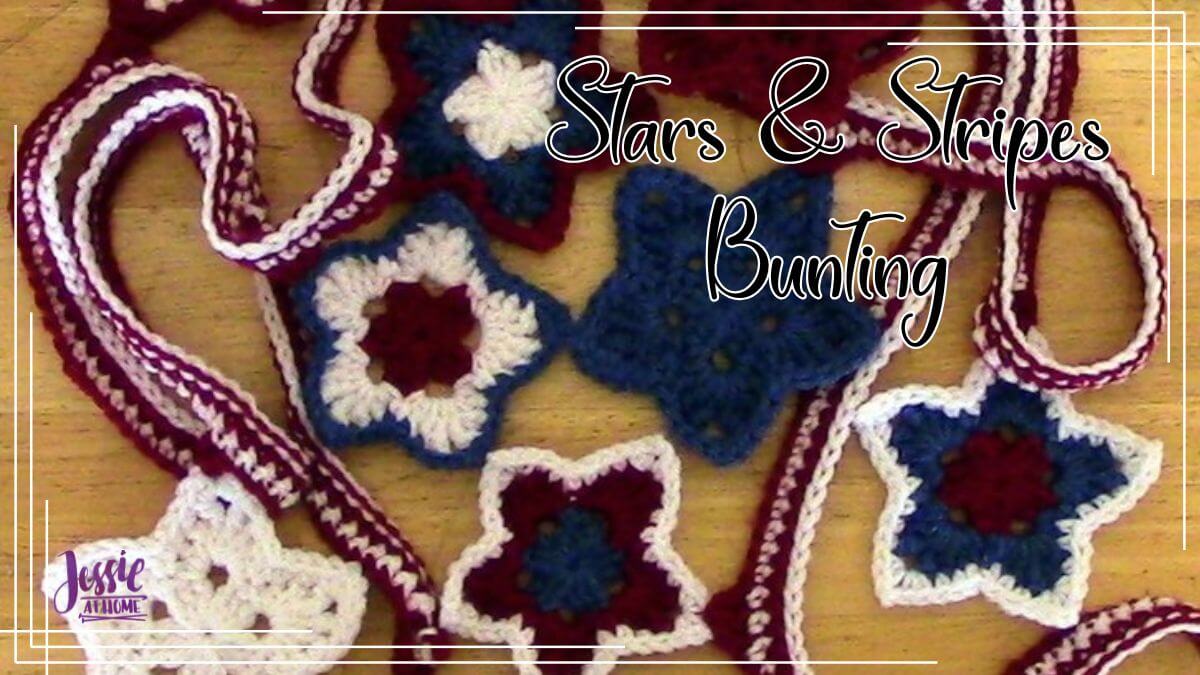
Inside: Create a charming crochet star garland for your summer festivities. Perfect for Fourth of July parties or porch decorations.
This pattern was originally published on March 25, 2014. The most recent update was made on July 16, 2025.
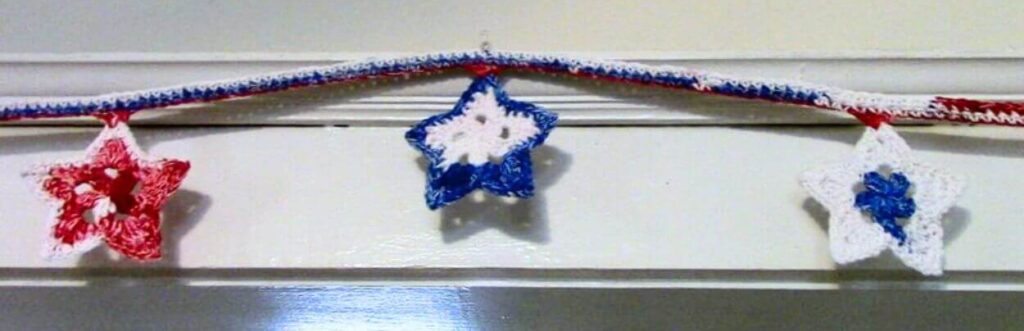
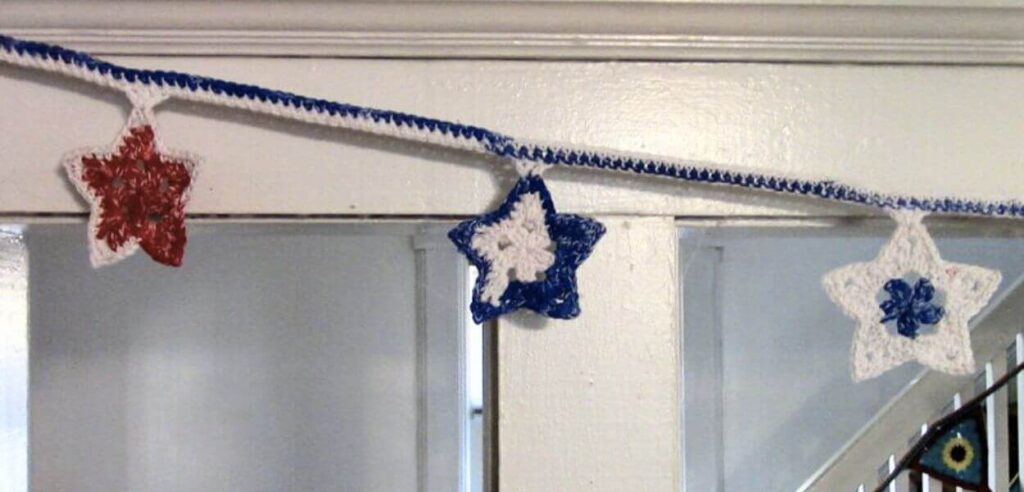
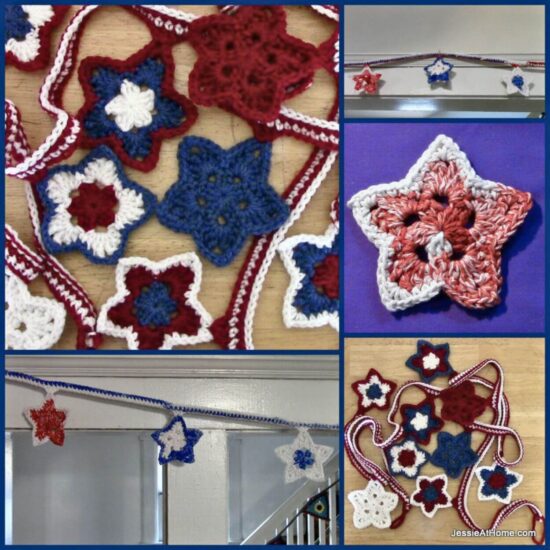
Stars and stripes bunting is one of my go-to ways for giving any space a fun, patriotic boost. Think summer barbecues, Fourth of July parties, or even just brightening up a porch during the season. This DIY bunting features little stars joined together by a striped crocheted ribbon, bringing together those classic American flag vibes with a handmade touch.
Table of contents
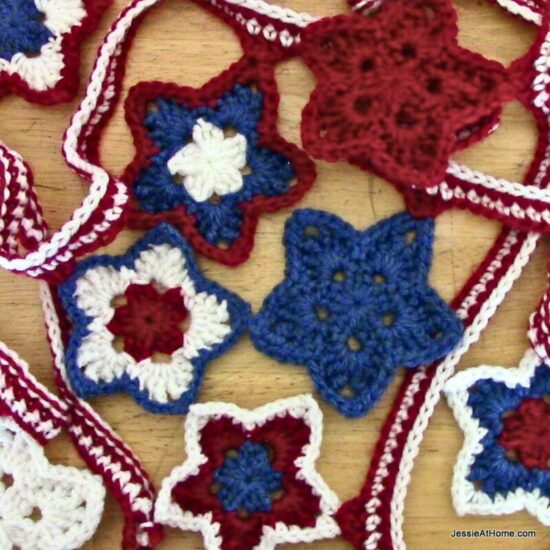
You don’t have to stick with classic red, white, and blue, though. There are a bunch of ways to make it your own, whether you mix and match yarn colors, choose all cotton for washable coasters, or play with the size for different displays. I’ve seen these used as party decorations, wall hangings, and even strung across fences. That flexibility is what I love about homemade bunting; it’s easy to personalize.
I’m breaking down everything you need to know to create your own stars and stripes bunting. Even if you’re new to crochet, this project is pretty approachable and only asks for a few basic skills. Read on for the supplies list, step-by-step pattern, tips for getting your best results, and ideas for making your bunting fit your style or occasion.
Supplies You’ll Want on Hand
You don’t need a bunch of fancy tools or expensive materials to make a string of patriotic bunting. Just pick up a few crochet basics and your favorite yarn to do the trick.
- Yarn: I like using worsted (medium) weight for a 4-5 in (10-12.5 cm) star. Cotton yarn is great if you want bunting that can double up as hardy outdoor decor, or if you are making coasters. For a lighter banner, DK yarn works too. Go classic with red, white, and blue or grab some variegated yarn for cool color changes.
- Crochet Hook: A 5.00 mm (US H/8) hook works well with worsted yarn but check your yarn label. Sometimes you’ll need to size up or down depending on the fiber and your tension.
- Yarn Needle: Perfect for weaving in ends.
- Removable Stitch Marker: Not strictly needed for experienced crocheters, but super helpful for the ribbon part.
- Scissors: The sharper, the better.
If you want your bunting to look extra tidy or last a long time outdoors, you might also want some fabric stiffener or a fabric-safe spray sealer, but that’s totally optional and up to you.
Sizing and Yarn Choices
The size of each star depends on your yarn and hook choice. I get stars about 4 to 4.5 inches across when I use worsted weight and a 5.00 mm hook. The thinner the yarn and smaller the hook, the smaller your stars will be, and the reverse is also true (big yarn/hook = big stars).
Cotton or bamboo yarn is a solid pick for durability and easy care, especially if you want to use your stars as coasters or appliqués. For a fluffier, bigger bunting, try thick yarn, or keep it light with DK cotton. Acrylic is wonderful for indoor use, and for kids, as it’s easiest to get stains out of and can take quite the beating. Think about where and how your finished items will be used when choosing your yarn.
Don’t feel locked into just red, white, and blue. Try pastel shades for spring, neutrals for a farmhouse look, or neon for a funky vibe. If you’re making bunting for a themed party or team event, just switch the colors to match! That’s what makes this pattern handy for all sorts of seasonal or personal celebrations. You can even mix up the star sizes for a really unique look.
Stars and Stripes Bunting
Easy Crochet Pattern
Designed by Jessie Rayot
Supplies
Size
It will depend on your yarn, with worsted weight yarn and a 5.00 mm hook the stars are about 4.5” across.
Yarn
Any really, for bunting I recommend a worsted weight or DK weight so it is not too small, and for coasters I recommend cotton yarn so that it absorbs any liquid. For the samples I used a variegated cotton mill end yarn (so I am unsure of the brand) and red, white, and blue Red Heart Super Saver.
Crochet Hook
Whichever size works with your yarn, for the sample I used US H/8 4.0 mm.
Gauge
Learn about gauge HERE
12 sts x 7 rows = 5″ (10 cm) square
Other Supplies
- Removeable Stitch Marker (1)
- Tapestry / Yarn Needle
Stitches and Abbreviations
click on highlighted sts for tutorials
ch: chain
dc: double crochet
hdc: half double crochet
tr: treble crochet
rnd: round
sc: single crochet
sl st: slip stitch
st(s): stitch(es)
tr: treble crochet
Get the Ad-Free Printable PDF at These Sites
- Crochet Foundry (Buy direct from me!)
- Ravelry
- Etsy
- LoveCrafts
Pattern Notes
- Read through all instructions before beginning.
- The stitch count is at the end of each rnd/row after the period, usually only if the count has changed from the previous rnd/row. [count here]
- Chs and sl sts are not included in stitch counts unless specified.
Pattern: Creating the Stars and Stripes Bunting
Making the Star Motif
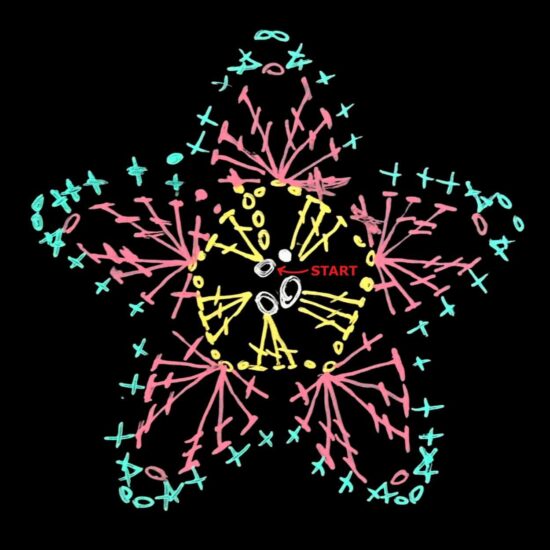
Start with a Magic Loop (or ch 3, sl st to first ch to form a ring): This gives you a tidy star center without any gaps.
Rnd 1: Ch 3 (counts as first dc), (2 dc, ch 3, [3 dc, ch 3] 4 times) in ring, sl st to top beginning ch-3 to join. [15 sts]
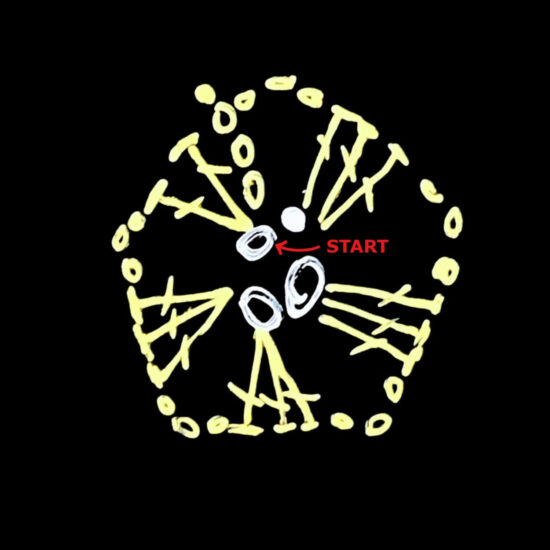
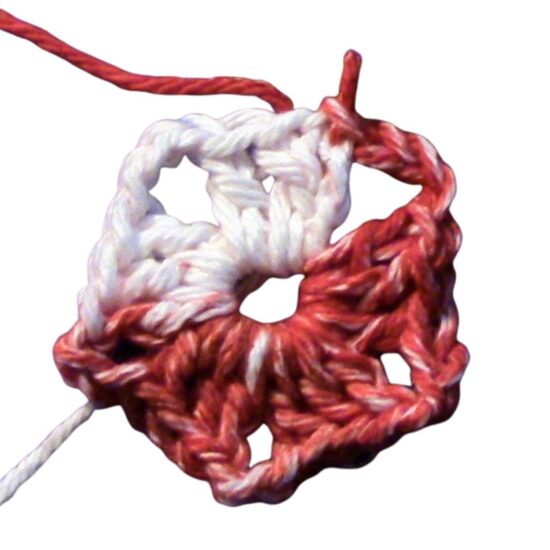
Rnd 2: Sl st in next 2 dc, sl st in ch-3, *(sc, hdc, dc, tr, ch 1, tr, dc, hdc, sc) in ch-3; repeat from * 4 more times, sl st to top of first sc to join. [40 sts]
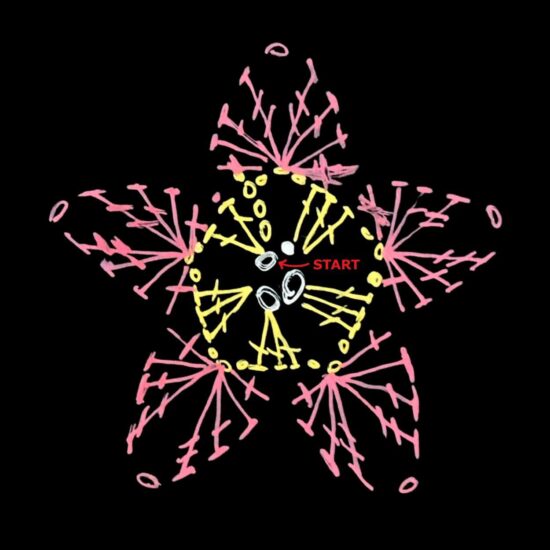
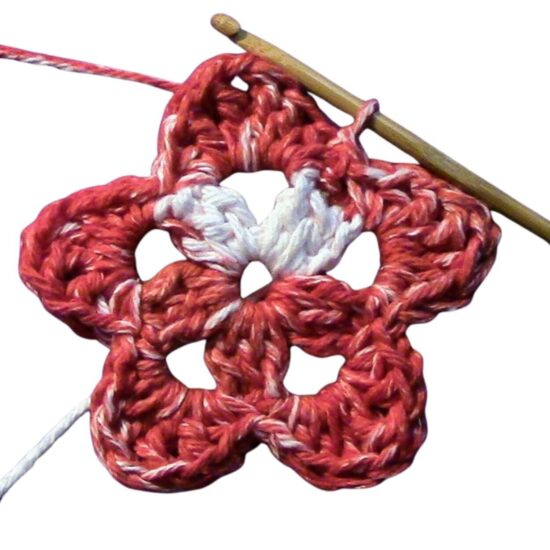
Rnd 3: *Sc in each of next 3 sts, (2 sc, ch 2, 2 sc) in ch-1 sp, sc in each of next 3 sts, skip next 2 sc; repeat from * 4 more times, sl st to top of first sc to join. [50 sts]
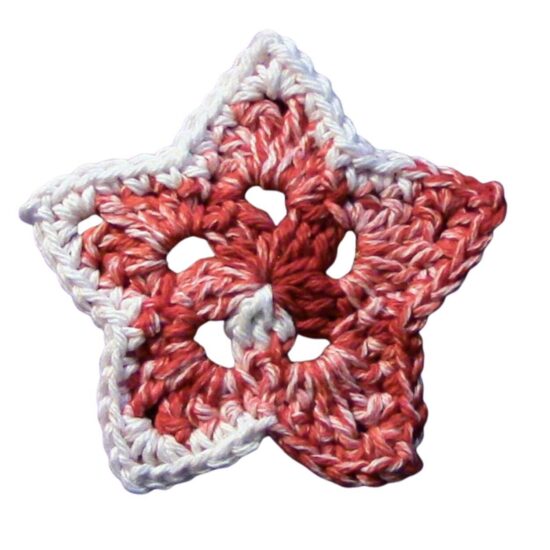
Fasten off, then weave in all ends.
Repeat until you have as many stars as you need for your bunting. For a typical string, I usually stick with five or seven stars, but make as many as you want for your space. You can go longer and add more for a really animated effect.
Crocheting the Striped Bunting Ribbon
This ribbon connects all your stars and is easy to personalize with color switches or even a simple border if you want a unique twist. To help keep the ribbon from stretching a lot, sl st across the top (last) row of the ribbon.
Row 1: Ch 20, sl st in first ch made to form first hanging loop, ch 30 (to stretch between stars), *3 dc in a ch-2 point of a star, ch 30; rep from * until all stars are attached, place marker, ch 20, sl st in marked st to form your second hanging loop.
Row 2: Turn, ch 1, sc in next ch, sc in each ch and dc across to next hanging loop.
Row 3: Turn, ch 1, sc in each sc across.
Repeat Row 3 as many times as desired.

Finishing
- Fasten off
- Weave in all ends
- Hang and enjoy!
Happy Stitching!
Video Tutorial
Customization and Tips for Best Results
- Color Choices: Try one solid color for each star or mix up every round for a colorful effect. For the ribbon, alternating stripes (red, white, and blue, for example) look really strong and patriotic but you could get creative—try ombrés or rainbow colors if you’re up for it.
- Blocking: Get those star points extra crisp by blocking your stars after the ends are woven in, and before they are attached to the ribbon. For super-simple blocking, pin them into shape on a towel, spray with water, and let them dry fully before hanging. This step is worth it for a professional finish.
- Hanging Tips: Use small Command-style hooks, thumbtacks, or tie the bunting onto porch railings or fences. If you plan to hang it outside, choose a weatherproof yarn or seal your finished stars with a fabric protector spray to protect the colors and shape.
- Projects Beyond Bunting: These stars look super cute as coasters, tree ornaments, gift tags, or on bags and hats as appliqués. Go ahead and crochet a bunch—these motifs are super versatile.
Common Questions: Troubleshooting Your Bunting
Why are my stars curling at the edges?
This usually happens if your tension is too tight or you skip a stitch on the pointy parts. Try crocheting more loosely and check each point for the right stitch count before moving on. If you still see curling, block your stars well to flatten them out.
Can I use different yarn weights together?
Mixing yarn weights can give you a quirky, boho look, but the stars will come out different sizes unless you change your hooks or adjust the rounds for each. For a uniform appearance, stick with one yarn weight throughout the project.
Do I need to block acrylic yarn?
It helps to steam acrylic stars very lightly using an iron with a towel barrier, or by hovering OVER the stars with the steam on. This helps your stars lay flat, giving you crisp points and tidy bunting overall.
Bottom Line & Getting Started
Making your own stars and stripes bunting is an easy and creative way to show off your crafty skills at patriotic gatherings or anytime you want to add a splash of color to your home. With a few supplies and some basic crochet stitches, you can create a bunting as bold or as soft as you like. Mix up colors, add more stars, or even use these motifs in other crafting projects. This handmade addition will definitely get noticed, and the process itself is just as rewarding as displaying the final result.
If you’re ready to jump in, here’s a quick-start checklist to keep you on track:
Quick Start Checklist:
- Pick your yarn in red, white, and blue (or your chosen palette).
- Begin slowly with the first star to get into the pattern, then the rest will be much faster.
- Block the stars.
- Crochet the connecting ribbon adding the stars as you complete the first row. Change the length as needed for your space.
- Hang up your bunting with pride!
Have fun with your color combos and purpose—these stars and stripes can fit almost any event or style.
What colors are you thinking of for your own bunting? Share your ideas, tips, or unique uses in the comments and see how many different ways this crafty bunting can bring a bit of next-level cool to your space!
Did you enjoy what you found here at Jessie At Home? Then sign up for my newsletter and like my Facebook page, so you’ll get all the updates on new tutorials, other posts, sales, and coming events.
If you have any questions, want to share pictures of your work, or just want to chat with Jessie and other crafty individuals, than join one of our free Zoom Sit & Stitches. Find them on our Events Calendar.

© Copyright 2014 Jessie Rayot / Jessie At Home®, LLC All my videos, patterns, charts, photos and posts are my own work, so you may not copy them in any way. If you want to share this information with someone, then share the link to this post.


I love the bunting! I’m planning on making it for the 4th of July and it’s my dad’s birthday. And he sure is a firecracker 🧨. Thank you so much for your patterns. Happy Mothers Day!
Thank you! Enjoy. 🙂