
Inside: Dropped and Found is a free and easy knit rectangular shawl pattern with several sections of textured Jacob’s ladder stitches.
This pattern was originally published on 1/27/2015. The most recent update was made on 12/2/2022.
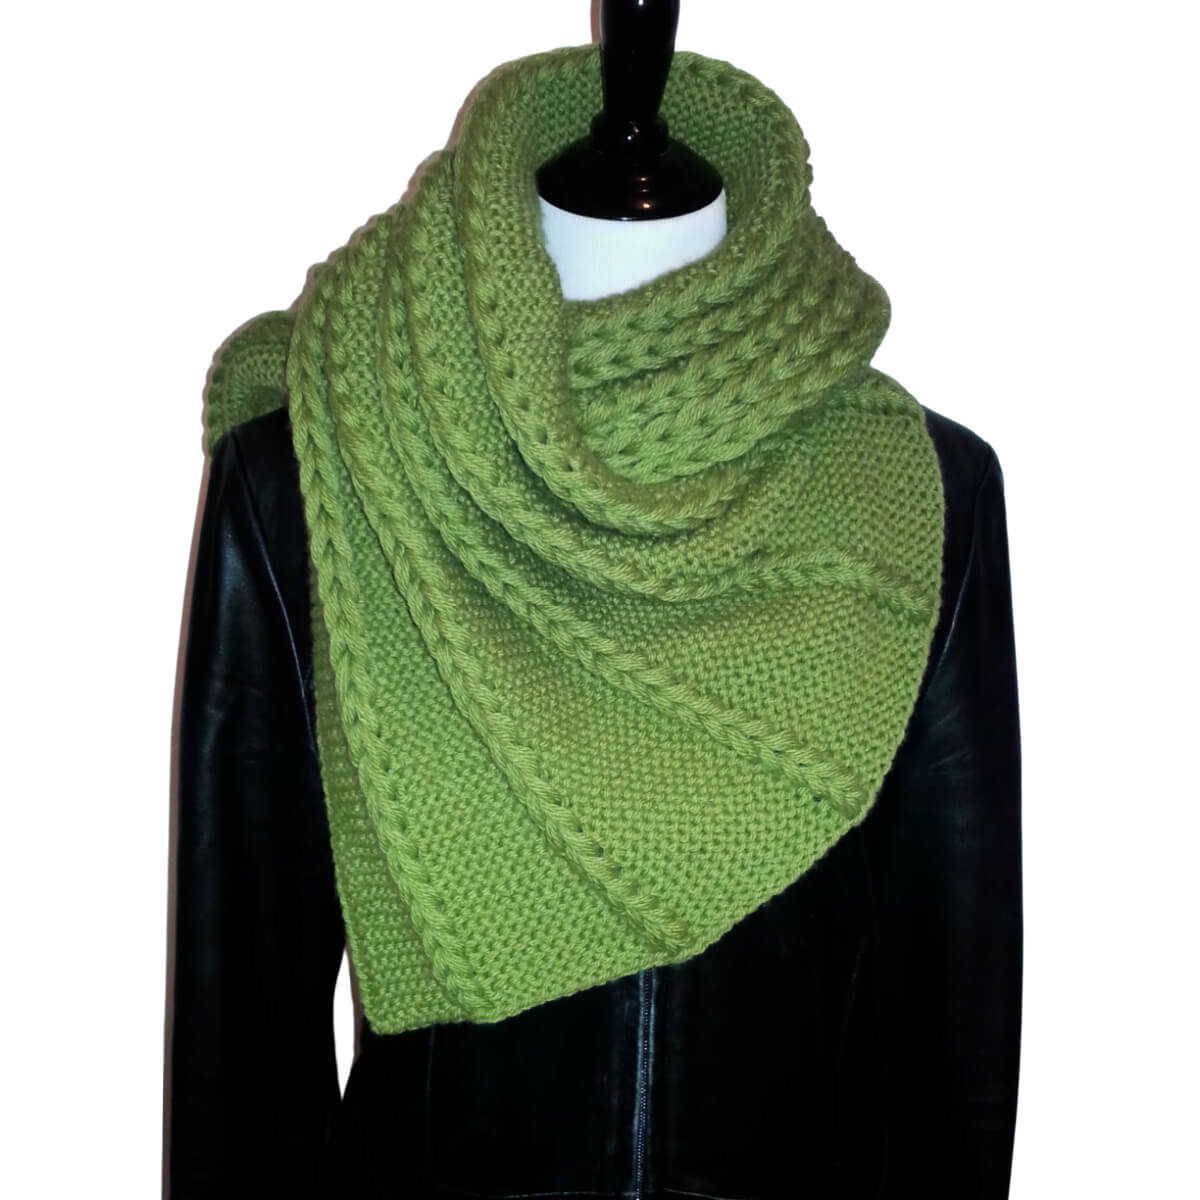
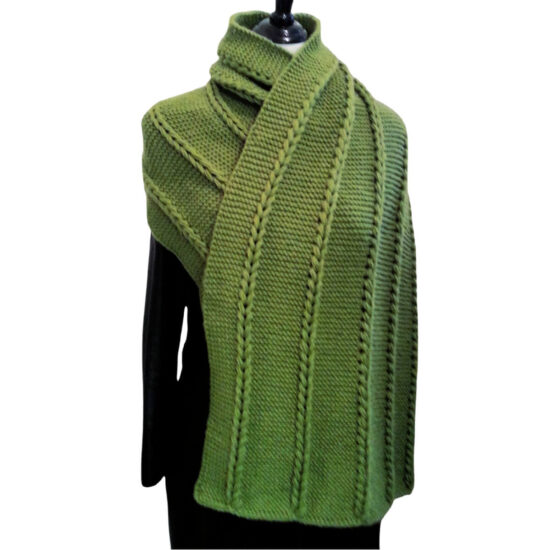
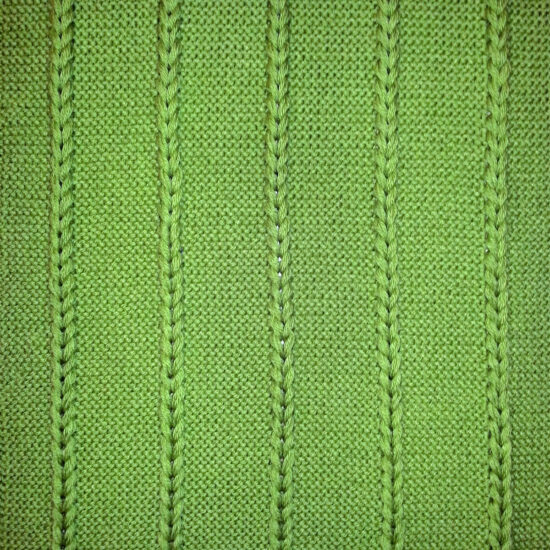
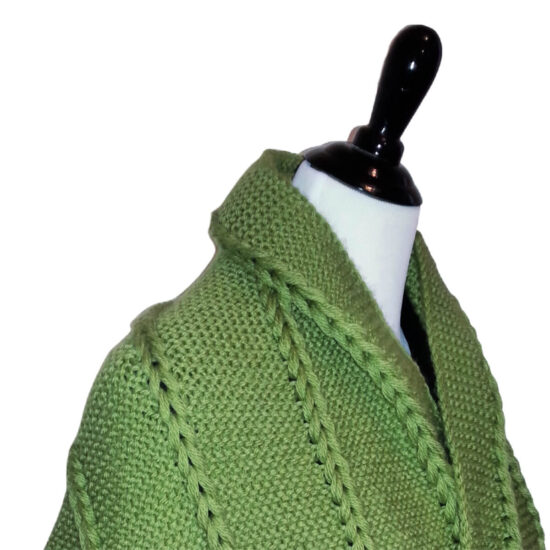
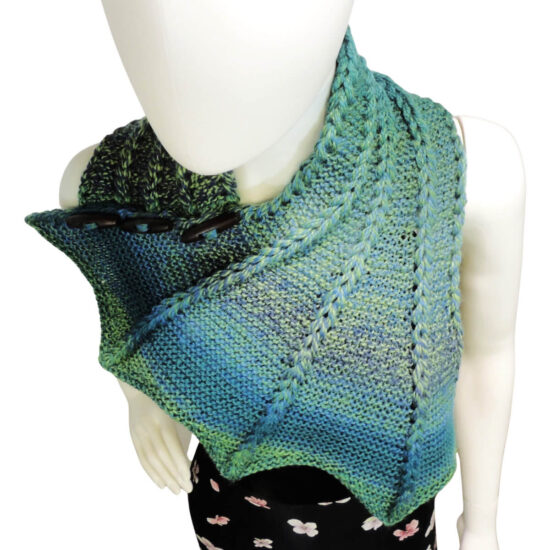
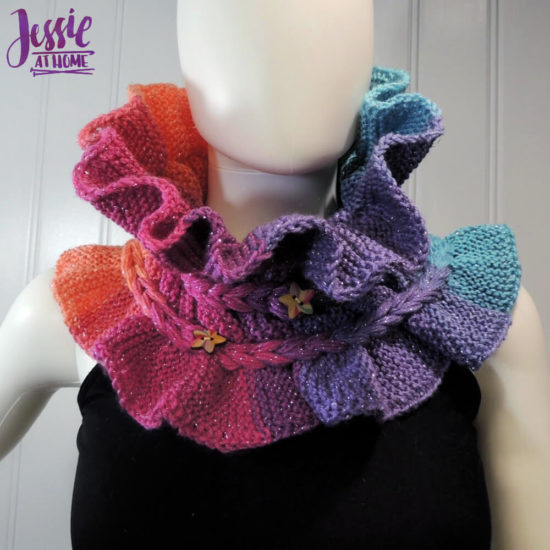
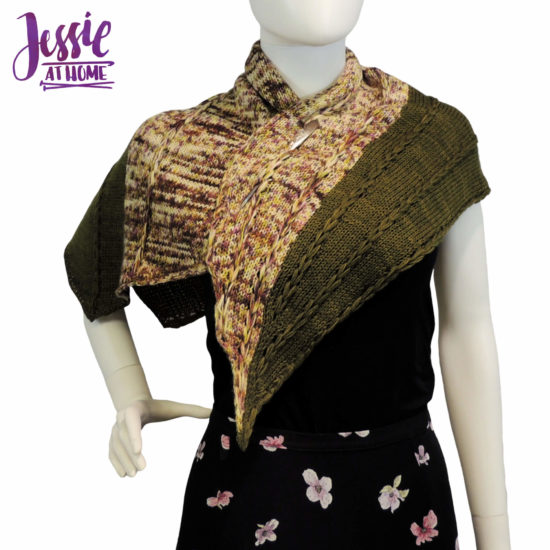
Dropped and Found is a warm wrap that is much simpler to make than it looks. It uses dropped stitches woven back together in larger stitches to create texture and a unique detail.
In the cold, shawl weather, wearing this rectangle shawl will provide warmth to you or the recipient of a very lovely gift. Made for a special occasion, a prayer shawl, or simply as a layer against the crispy cold wind, this knit shawl is always a good choice to cast onto your needles!
Table of contents

I’ve been a fan of the crochet Jacob’s ladder stitch for quite some time. As both a crocheter and knitter, I knew there had to be a way to simulate the stitch in knitting. After a few experiments, I came up with a way, and the Dropped and Found wrap was created.
The important thing to remember is that you are knitting a BIG rectangle until almost the very end. The Jacob’s ladder starts just 2 rows before the bind off. At that point your garter stitch shawl will totally transform!
Video Tutorials
- Tutorial for Long Tail Cast On
- Tutorial for Knit Jacob’s Ladder Stitch
- Tutorial for slipping the first stitch
Dropped and Found Wrap
Knit Pattern
Easy Skill Level
Designed by Jessie Rayot
Supplies
Size
19″ x 52″ (or as long as you want)
Yarn
Berroco Vintage Chunky: (52% Acrylic, 40% Wool, 8% Nylon), Size 5 – Bulky/Chunky, 131 yds / 100 g, (1.31 yds/g)
6 to 7 skeins in the color of your choice (6.3 skeins were used in sample)
Knitting Needles
US 10, (6.0 mm)
Gauge
Learn about gauge HERE
16 sts x 32 rows = 4” [10 cm] in Garter Stitch
Other Supplies
Stitches and Abbreviations
click on highlighted sts for tutorials
co: cast on
k: knit
st(s): stitch(es)
yo: yarn over
( ): work step in parentheses in indicated stitch
[ ]: work step in brackets number of times indicated
Get the Ad-Free Printable PDF at These Sites
- Jessie At Home – Buy directly from me, you can also get bonus printables!
- Ravelry
- Etsy
- LoveCrafts
Pattern Notes
- Read through all instructions before beginning.
- The stitch count is at the end of each row after the period, usually only if the count has changed from the previous row. {count here}
- Follow the directions: many people think this should be difficult, when it is not, so they are trying to add in stitches and drop things too early. This pattern is worked in garter stitch to start off, all the way until the piece is the length you want, then sections of stitches are dropped and worked back together in larger stitches.
- If you are at all confused, please watch the video, this is a super simple pattern, if you are having trouble, you are most likely overthinking things.
- The edge of this wrap has a chain look because of how the first stitch is slipped. Here is a tutorial showing the technique.
Dropped and Found Pattern
Garter Stitch Section
Using the Long Tail Cast On, CO 81.
Most other cast ons will not unravel properly for the dropped stitches, so be sure to use this method. Here is a tutorial to help
Row 1: Slip 1 purl wise with yarn in front, K to end.
Repeat row 1: to desired length.
Do NOT cut yarn or finish off in any way.
Making the Jacob’s Ladder
Next comes the Jacob’s Ladder technique. You can find a video tutorial that shows this technique in my Stitchopedia, HERE.
Row 1: Slip 1 purl wise with yarn in front, K8, drop 3 sts, yo [K12, drop 3 sts, yo] 4 times, K9.
Row 2: Slip 1 purl wise with yarn in front, K to end, ignoring dropped sts.
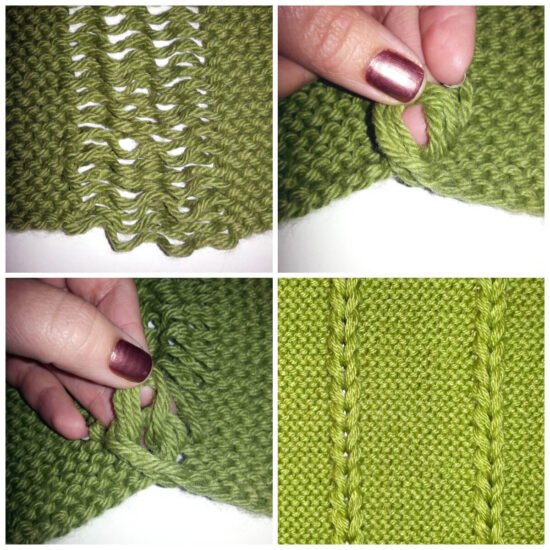
Chains, Step 1: Pull the dropped stitches all the way to the bottom. Count the dropped strands in groups of 4. You do not need to know how many groups of 4 you have, you just need to know if you have a multiple of 4, or if you have a multiple of 4 with 1, 2, or 3 left over.
If you have a multiple of 4 with no strands left over, you will use 4 strands for all the loops in step 2;
if you have a multiple of 4 with 1 strand left over, you will use 5 strands for the first loop in step 2, and 4 strands for the rest of the loops in step 2;
if you have a multiple of 4 with 2 strands left over, you will use 5 strands for the first and last loop in step 2, and 4 strands for the rest of the loops in step 2;
if you have a multiple of 4 with 3 strands left over, you will use 3 strands for the last loop in step 2, and 4 strands for the rest of the loops in step 2.
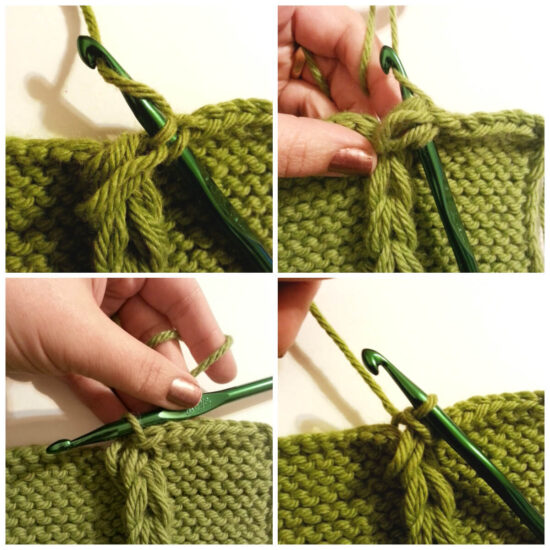
Step 2: Take the bottom 4 (or 5) strands from the dropped sts, hold them together, and twist them half a turn to make a loop, * grab the next 4 strands together and pull them through the loop (do not twist), repeat from * until all the dropped strands have been turned into a chain. This can be done with your fingers, or with a large crochet hook. Leave the last loop
Finishing
Bind Off: Bind off 8, slip the set of loops from the looped section onto the right needle, K1, pass all remaining sts on the right needle over the st just made (1 st left on right needle) [bind off 12, slip the set of loops from the looped section onto the right needle, K1, pass all remaining sts on the right needle over the st just made (1 st left on right needle)] 4 times, bind off remaining sts.
If the looseness on the bottom bothers you, then you can make a crochet slip stitch along the bottom edge, place one slip stitch in each st, and one in the bottom of each loop.
Fasten off then weave in all ends.
Happy Stitching!
FAQs
Don’t fret my fellow yarnist; it’s all good! You’re creation will be a big ol’ garter stitch rectangle right up to the end. Once you have your rectangle as long as you want it, you will drop some stitches and everything will change. Follow the pattern and ridges/chains will happen.
You sure can! Don’t catch the top loops of the ladders in the bind off. Seam the top and bottom together. Then use some sewing thread to stitch the last loop of each ladder down over the first one. There are more ideas in Showstopper Creations.
I suggest a light blocking.
If you change the yarn weight, know that the width will change depending on your gauge.
To change the width by stitch count, add or subtract a multiple of 6 sts to the cast on. So +/-(N x 6) with N being whatever number you need to get a width just a bit wider then you want your finished shawl.
Then adjust Row 1 of the Jacob’s ladder section by adding or subtracting your multiple (N) to the starting and ending number of knit sts and to each number of knit stitches in between the dropped stitches.
Did you enjoy what you found here at Jessie At Home? Then sign up for my newsletter and like my Facebook page, so you’ll get all the updates on new tutorials, other posts, sales, and coming events.
If you have any questions, want to share pictures of your work, or just want to chat with Jessie and other crafty individuals, than join one of our free Zoom Sit & Stitches. Find them on our Events Calendar.

© Copyright 2015 Jessie Rayot / Jessie At Home®, LLC All my videos, patterns, charts, photos and posts are my own work, so you may not copy them in any way. If you want to share this information with someone, then share the link to this post.


Very pretty Jess.
Thanks, Mom!! It’s warm and cozy, too!!!
i enjoyed your project. Would love to have the pattern. I knit and crochet. Thanks
The pattern is in the post.
This is brilliant! Thanks for sharing.
I attempted to open the PDF so that I could print the directions
but it wouldn’t work. I went to the Oravely page and it directed
me back here. Maybe you could check the site or email the directions
to me, please. This scarf is beautiful.
I just tried and it works fine. Be sure you click on the link for the printer friendly PDF on Craftsy.
Great job Jessie. I have been knitting for over 45 years and love the new ideas. Keep up the good work.
Thank you! I have been playing with the Jacob’s ladder stitch in crochet, and so I had to make something using the similar technique in knitting!
This looks perfect for getting me away from sock knitting!
A question about this pattern. do you follow the pattern — dropping all the stitches as you progress and then do the pick up at the end?
You just follow the pattern. It tells you when to drop the stitches.
Thanks for sharing!!!
I am not a fan of synthetics, so I tried this in an Aran wool. I only knit up a swatch. The wool is so stiff, even after washing, that it doesn’t give the drape needed. I am guessing that the synthetic blend you used offers the necessary drape. I am now looking at the Berroco Ultra Alpaca Chunky, thinking that the alpaca would provide the necessary softness/drape. What do you think?
There are plenty of natural fibers that have drape to them, including wool. It will depend on the yarn. I have not tried the Ultra Alpaca Chunky, so I do not know about the drape of that one. If you have an issue with the yarn I used, you can go to your LYS and show them what you are making and ask them for advice.
Any suggestions for how many to cast on if making an infinity scarf instead of a wrap so that the (braids??) are closer together and the same distance apart?
You make it the same way, and just adjust the width and seam it together. Or you can try using a provisional cast on, dropping the sts, and then grafting it together.
I cannot get this to work out. decreasing more stitches than are put back on. Is there a type-o or am I not “getting” something.
I think you are missing something. There are no decreases until the very end after you drop all the sts. You drop in sets of 3, and then add just 1 for each set of 3 because when you loop the dropped sts they become 1. Did you watch the video?
AH, thank you so much. I cant wait to get started now.
Will worsted weight work for the Dropped & Found wrap?
Thanks in advance.
Sure, it will just be a little thinner.
How much yarn would it take if using worsted weight, and would you use same size needle?
Hazel
I’m not sure how much it would take, as I haven’t tried, and I would use the needles that go well with the yarn you are using.
Just wondering if you blocked your finished shawl?
Yes, lightly.
I totally misunderstood the directions and dropped stitches and 3 Y O each row. It still worked. Only could weave 2 @ at time to make the braid. Ending it was super easy and the start row wasn’t loose since I made my own directions!!! Love this pattern, even if I messed it up.
Very chic looking wrap. Love the creativity involved in this pattern. Thank you for sharing. The video definitely helped. As soon as I have enough yarn, I’m making this. 🙂
I am wondering if you could tell me the multiples if I wanted to CO less than 81? Thank you!
Whatever you want. The sections that get dropped are 3 sts, so just decide how many braided sections you want, and how many sts you want between them and on the two sides, then go from there.
This is an awesome wrap! well done. I have shared this on my blog and face book page.
Thank you so much!
Thank you for this pretty pattern!
Friend made it, and I love it. Simple, fast and elegant.
My next project!
Awesome pattern, enjoyed working it to the fullest . It is very easy. The outcome is beautiful.
Thank you!
So clever! Thank you for sharing.
This is gorgeous! However, my knitting skills are really bad. I’m practing though! In the meantime, do you plan to design and release a crochet version of the Dropped and Found Wrap? Please, please, pretty please, say yes?
I would like to sell a scarf knit from your pattern in my Etsy store, but I wanted to check with you first to see if it was OK. I would, of course, include a link to this page in the listing.
You may sell finished item from my patterns, just not the patterns themselves, so have at it! Good luck, and I hope it does well for you!!
I just finished the scarf last night – didn’t have enough yarn, so I had to modify the pattern a bit – but here it is if you want to check it out:
https://www.etsy.com/listing/458926958/dropped-and-found-purple-scarfwrap-with
It’s lovely! Thank you for the design credit. I hope it does well for you.
HI,
My mom has Alzheimer’s and this pattern is great for her to do…she can knit all the garter and be content and I can do the dropped stitches and finishing parts. Some days are harder than others and I forgot to do the right cast on for the vest she is currently working on. Is there a way to still do the dropped stitches and just add a crochet chain to the bottom with a few lengths of yarn…or do you have any other suggestions. She is almost 3/4 done and it will be awful for her to see that her knitting was wasted! Thank You!
I don’t know what will happen when you get to your cast on, but if it doesn’t drop, you should be able to improvise.
Thanks…hope I can be creative and pull it off so it looks good and drapes well.
I am interested in the drop and found wrap/shawl. Also would like to search yarn shop for a certain team color I am trying to find.
That is just so very very clever 🙂
I can’t believe this method/green pattern was in English all along! I’ve saved Russian and Spanish links thinking I’ll try a translator app. Lol. Honestly, check my Pinterst under Knit – Instruction and under Knit – Stitches. Lmao. Thank you so much. I’ve backed this up about 5 ways.
This looks amazing and will show off my homespun yarn so well. I am looking forward to trying it very soon. Thank you for sharing this pattern and the video tips!
Very pleased to have found this lovely, new knitting pattern! Elsewhere I have read comments from folks who have made this and have found that drawing up the dropped stitches shortens the piece. You state a 52″ length dimension. Is this before or after the dropped stitches are drawn up into the braided effect? Thank you for your reply. Karen
It’s the finished size, but it didn’t shorten my piece. Maybe they have a tighter gauge or used a bulkier yarn?
Am I going round the bend? It does say crochet in the title but the instructions re for knitting?
I’m so sorry, I think someone I hired to do some SEO work changed a bit more then they should have and this would be one of those things. It is knitting and I’m fixing the changes they made.
I really like this pattern and would like to make this into a bigger blanket shawl. Do you think it would work better to cast on the long edge and knit up the short edge, or to cast on the short edge and knit up for length (like your pattern, only wider)?
You can only drop the stitches to make the chain on the top in one direction, so if you change the direction you knit it in, you change the direction of the chains.
How many stitches should I cast on if I want to make the shawl wider, ie., 22”, instead of 19” wide.
Do I add 6 stitches for each inch I want to add to the width?
You can add 4 stitches and increase 1 between each set of dropped stitches, or you can increase 6 stitches and add one between each set of dropped stitches AND one before the first set and one after the last set of dropped stitches.
Use that and your garter stitch gauge to determine how much you want to add to get your size.