
Ruffle Knit Pillow Cover
Knitt Pattern
Easy Skill Level
Designed by Jessie Rayot
This fun ruffled pillow cover will add some flair to any room! It can be made to cover any size pillow you want. I have written the pattern for the pillow I was covering, but I have included notes on how to adjust the size. You can also change the yarn and the gauge if that is your wish. Have fun!
Sizes:
Whatever size you want! My sample covers a small pillow that is 10.5” wide and 7.5” tall
Yarn:
A ~ Red Heart With Love in Hot Pink 1701
B ~ Red Heart Super Saver in Burgundy 0376
C ~ Red Heart Super Saver in Pumpkin 0254
Needles:
US 10 ½ /6.50 mm circulars (or long single points, just be sure there is enough room for the width of your pillow.) Or whatever size works with your yarn
Gauge:
My gauge was 16 sts in 4”, but instructions are written for adjusting for your own gauge.
Stitches and Skills used:
co ~ cast on
K ~ knit
P ~ purl
K2tog ~ knit 2 together
Yo ~ yarn over
Kfb ~ knit front and back
Getting Started:
If you are using a different gauge or a different size pillow, your math will work as follows:
1) Make a swatch that is wider than 4”and at least 2” tall. Measure 4” across the middle of the swatch and count how many stitches are in 4”. Divide that number by 4 to find your stitches per inch. {my swatch had 16 stitches in 4”. 16/4=4, so I had 4 stitches per inch}
2) Measure across your pillow. Multiply that number by your stitches per inch, and add 2. This is your cast on amount. {My pillow measured 10.5” across. 10.5×4=42, 42+2=44. My cast on amount is 44 stitches.
3) Measure your pillow top to bottom. Write this number down as your pillow height. You will use it in a few ways as you make your pillow.
Pattern:
With color A, co 44 (see “Getting Started” to determine your cast on for a different gauge or pillow size)
Button Hole Section:
Row 1 ~ 4: Slip 1 knit wise, k to end. {for different gauge, work this row until piece measures ¾”}
Row 5: Slip 1 knit wise, k5, k2tog, yo, k13, k2tog, yo, k12, k2tog, yo, k7. {for different size or gauge, place the (k2tog, yo) in the places where you want your button holes}
Row 6 ~ 10: Slip 1 knit wise, k to end. {for different gauge, work this row until piece measures 1 ½” from co edge}
Top of Pillow Back:
Row 1: With color B, slip 1 knit wise, k to end
Row 2 ~ 12 even: Slip 1 knit wise, k to end
Row 3 ~ 11 odd: Slip 1 purl wise, p to end
{for different gauge, work rows 2 & 3 until piece measures 3 ½” from co edge, ending with row 2}
Pillow Front:
Row 1: With color A, slip 1 knit wise, k to end
Row 2 ~ 10 even: Slip 1 knit wise, k to end
Row 3 ~ 9 odd: Slip 1 purl wise, p to end
{for different gauge, work rows 2 & 3 until piece measures 3 ½” from co edge, ending with row 2}
Repeat Rows 1 ~ 10 with color B
Repeat Rows 1 ~ 10 with color A
Repeat Rows 1 ~ 10 with color B
{for different gauge/size, work rows 1 ~ 10 in alternating colors until piece measures the height of your pillow plus 2 ½” from co edge}
Pillow Back Bottom:
Row 1: Slip 1 purl wise, p to end
Row 2: Slip 1 knit wise, k to end
Repeat rows 1 & 2 until piece measures 15”, ending on row 2
{for different gauge/size, work rows 1 & 2 until piece measures twice the pillow height from co edge, ending with row 2}
Button Section:
Row 1 ~ 10: Slip 1 knit wise, k to end. {for different gauge, work this row until button section measures 1 ½”}
Bind off knit wise.

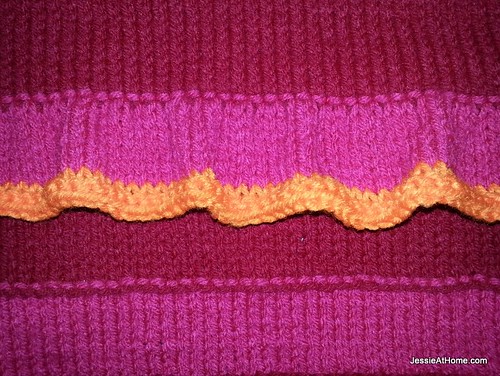
Ruffles:
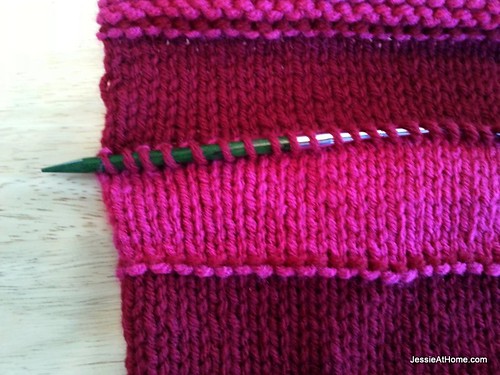
Starting from the right side (with the button hole section on the top), pick up the second st and each of the next 41 sts from the ridge formed along row 1 of the pillow front. {for different gauge/size, pick up 2 less than the total number of sts in row 1, still done by skipping the first and last st of the row}
Row 1: Working from the left to right, so that you are working on the front, with color A, [k1, kfb] to end.
Row 2 ~ 6 even: Slip 1 purl wise, p to end
Row 3 ~ 7 odd: Slip 1 knit wise, k to end
Row 8: Switch to color C, slip 1 purl wise, p to end
Row 9, 10: Slip 1 knit wise, k to end
Bind off knit wise.
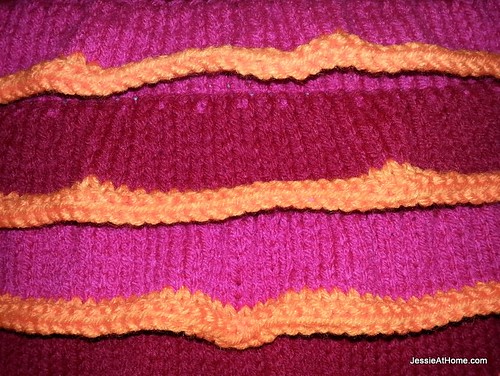
Repeat on next ridge with colors B and C, then on next ridge with A and C, and once more on last ridge with B and C.
Fold down the top of the pillow cover 3”, with right sides facing, pin. Fold up bottom, with right sides facing, so that the button section is on top of the button hole section, pin. Use scrap yarn to hand stitch the sides shut. Be sure to catch the edges of the ruffles so that they lay down. Weave in ends. (Confession time: I tied knots in the ends! I know, knots in knit are bad, but these are inside the pillow cover, so go ahead, be knotty!)
Turn right side out, sew on buttons. Put pillow in the cover, button closed, and squish!!

To find a printer friendly version of this pattern (text only, in black, no photos) click here. This will bring you to the listing for this pattern on Craftsy, where you can also find printer friendly versions of all my free patterns, and where you can purchase my sale patterns.

If you enjoy what you have found here at JessieAtHome, please like our Facebook page to get all the updates on new tutorials, other posts, sales, and coming events.
If you have any questions or concerns, want to share pictures of your work, or just want to chat with Jessie and other crafty individuals, than join our Facebook group.

©Copyright 2014 Jessie Rayot / Jessie At Home All my videos, patterns and posts are my own work. Do not copy them in any way. If you want to share this information with someone, share the link to this post. If you want to share on your own blog / website, then you may use the first photo in this post and link back to this post. You may not give away printed copies of this post. Thank you.
This post may contain affiliate links/ads. If you purchase something from a link in this post, I may be compensated.


