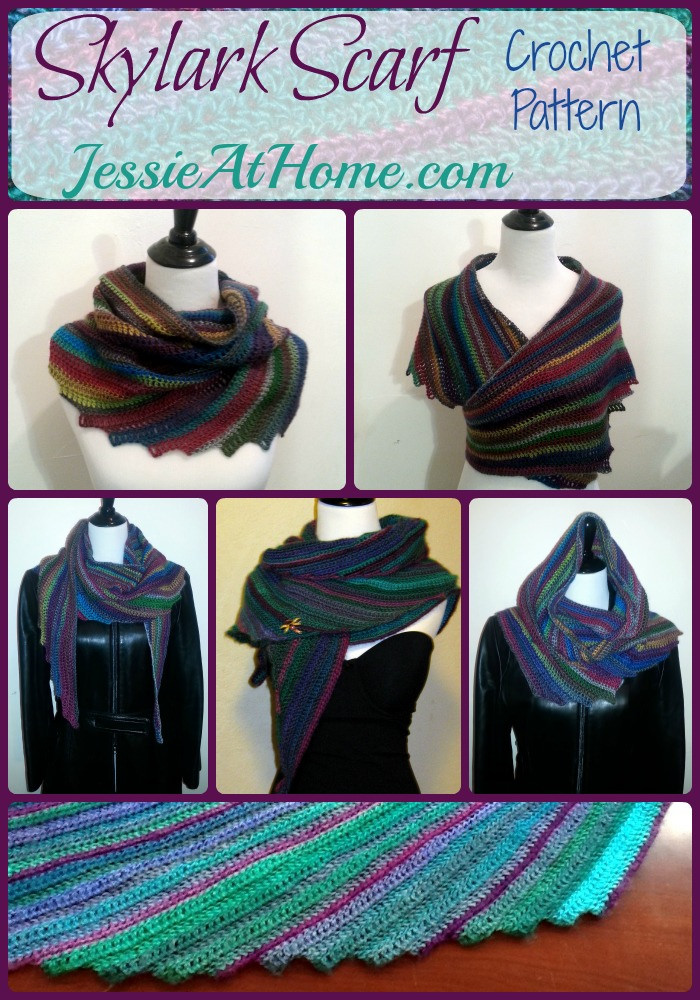
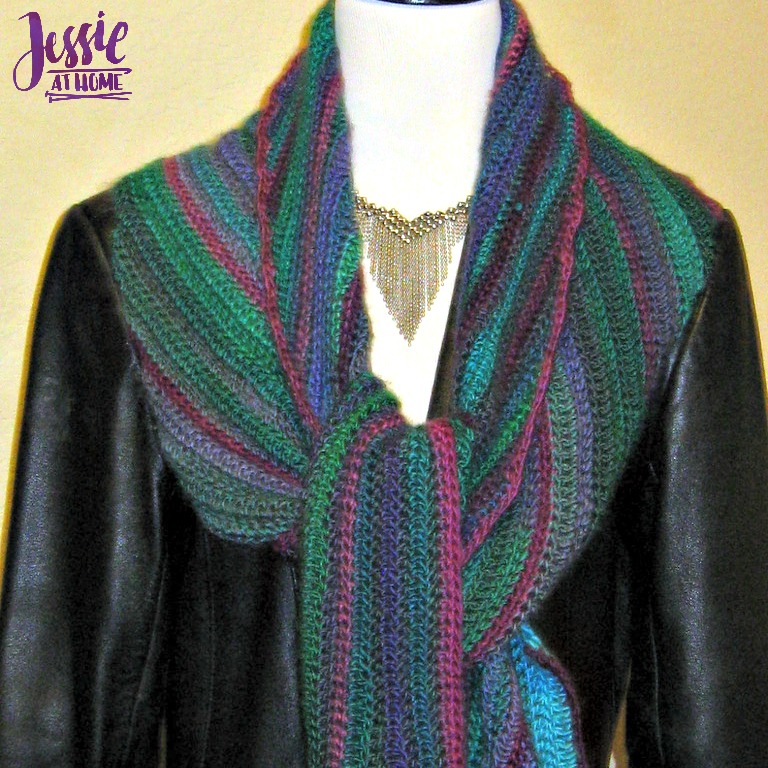
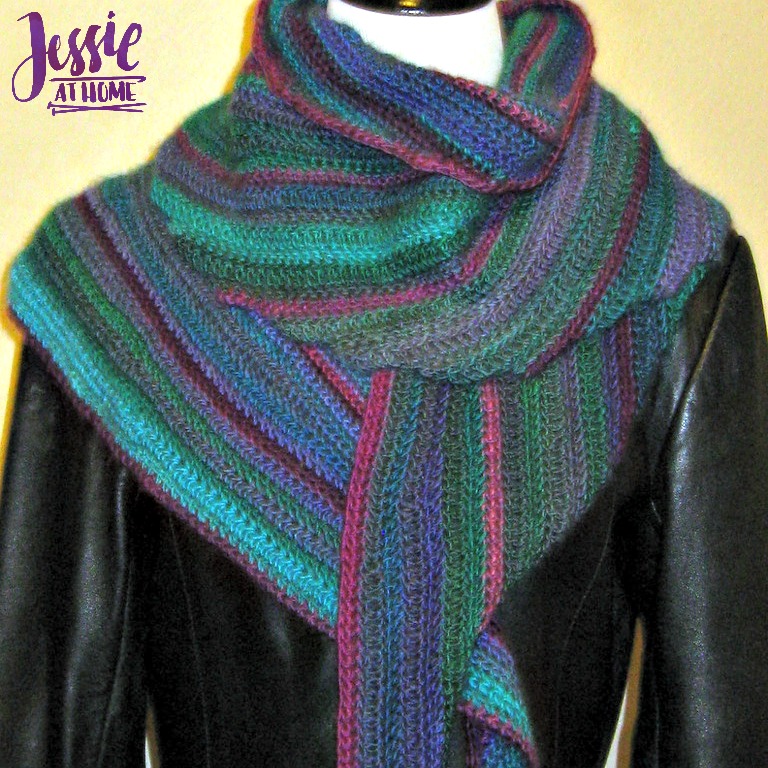
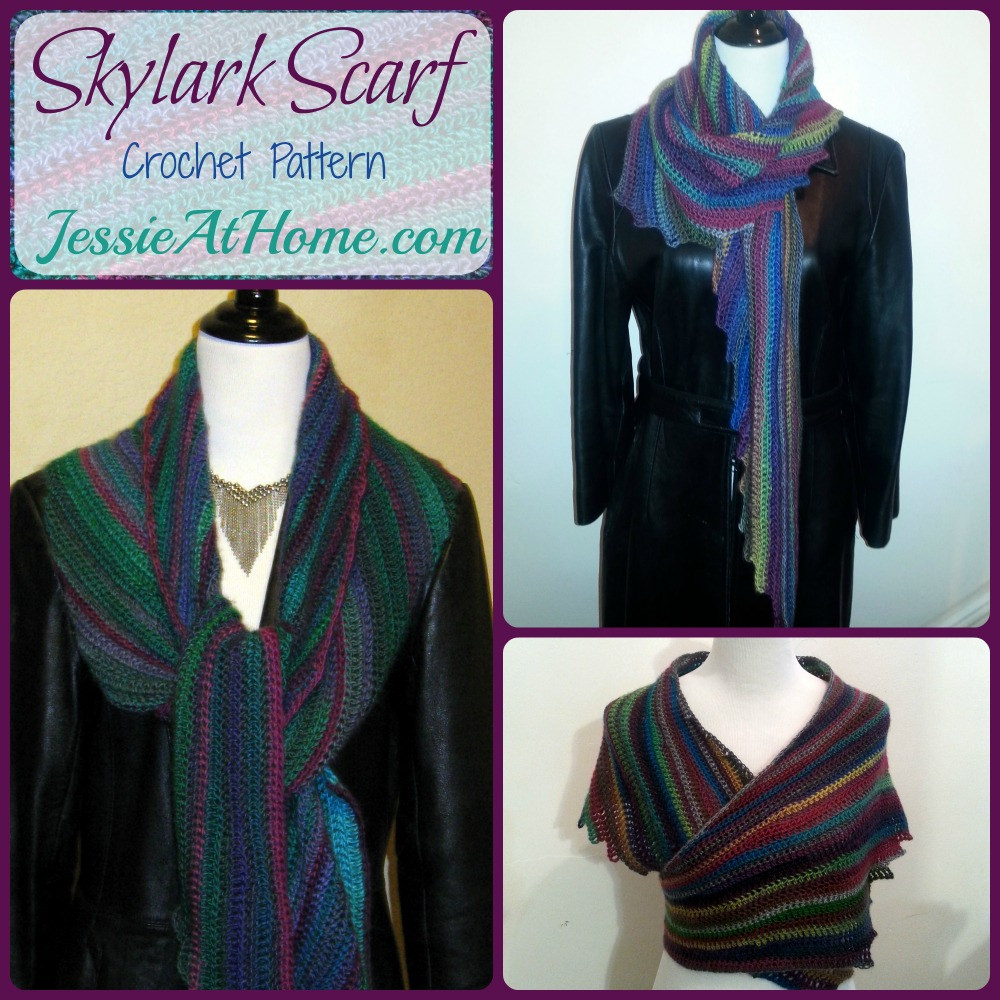
Skylark is not your typical scarf. It is made at an angle, a little off kilter, and a little wider than most scarves, making it a cross between a scarf and a wrap. There is a diagonal stripe of contrasting color every several rows. Skylark is sure to get attention wherever you go!

Skylark Scarf
Free Crochet Pattern
Intermediate Skill Level
Designed by Jessie Rayot

Size:
80” x 11”
Yarn:
RED HEART® Unforgettable: 1 1/2 skeins main color (A) 1 skein contrasting color (B).
Hook:
US 8/H/5.00 mm
Gauge:
18 sts x 20 rows = 4” in single crochet
Stitches and Skills used:
ch – chain
dc – double crochet
hdc – half double crochet
sc – single crochet
fsc – foundation single crochet(optional)
st(s) – stitch(es)
Getting Started:
There is no turning chain on the even numbered rows. Just make the first sc in the first st as indicated in the pattern.
Skylark will need to be blocked. I used blocking wires, but if you have enough pins you can pin it down to block it.
There are 2 different scarves seen in the photos in this pattern, one using Dragonfly as color A and Petunia as color B, the other using Stained Glass as color A and Bistro as color B
Tester Credits:
I had one wonderful tester for this pattern: Dawni Criswell
Pattern:
Row 1: With color B, fsc 90
~or~
Ch 91, turn, sc in second ch from hook and each ch across (90 sts)
Switch to color A
Row 2, 4, 6: Turn, sc in each of the next 5 sts, carrying color B under the stitch, sc in each of the next 25 sts, hdc in each of the next 30 sts, dc in each of the next 30 sts. (30 sc, 30 hdc, 30 dc)
Row 3, 5, 7: Ch 7, turn, dc in 4th ch from hook and in each of the next 3 chs (the last 3 chains of the ch 7 count as a dc), dc in each of the next 25 sts, hdc in each of the next 30 sts, sc in each of the next 30 sts, leave remaining 5 sts unworked. (30 dc, 30 hdc, 30 sc)
Switch to color B
Row 8: Turn, sc in each of the next 5 sts, carrying color A under the stitch, sc in each of the next 85 sts. (90 sc)
Row 9: Ch 6, turn, sc in second ch from hook and in each of the next 4 chs, sc in each of the next 85 sts, leave remaining 5 sts unworked. (90 sc)
Repeat rows 2~9: 7 more times, or to desired size, then repeat rows 2 ~ 7 once more.
Border: *Please note that the border only goes around 3 sides. The longest side with the larger points does not get a border.*
Switch to color B
Row 1: Turn, sc in each st across. (90 sc)
Row 2: Turn, sc in each st from row 1 (of the border) across, * hdc in next st, sc in next 4 sts, repeat from * to end of top edge.
Clip yarn, weave in all ends.
If you enjoy what you have found here at JessieAtHome, please like my Facebook page to get all the updates on new tutorials, other posts, sales, and coming events.
If you have any questions or concerns, want to share pictures of your work, or just want to chat with Jessie and other crafty individuals, than join my Facebook group.
Did you enjoy what you found here at Jessie At Home? Then sign up for my newsletter and like my Facebook page, so you’ll get all the updates on new tutorials, other posts, sales, and coming events.
If you have any questions, want to share pictures of your work, or just want to chat with Jessie and other crafty individuals, than join one of our free Zoom Sit & Stitches. Find them on our Events Calendar.

© Copyright 2014 Jessie Rayot / Jessie At Home®, LLC All my videos, patterns, charts, photos and posts are my own work, so you may not copy them in any way. If you want to share this information with someone, then share the link to this post.
If you enjoy this free crochet pattern, please consider buying some of your supplies from one of these affiliate links. Thank you.


Thank you so much for sharing
I love the colors and the shape Jess
Thanks, Mom!
Very eye-catching! I think I’ll have to make one of these:)
Very beautiful and useful pattern. Thank you for sharing.
This is lovely. Thank you so much for sharing! Definitely going to make one.
So beautiful Jessie, thanks so much for sharing!!!
thanks for sharing this pattern. I saw it on the Moogly facebook newsfeed. I am a beginner and I think I can do this.
If you run into any problems, ask on my Facebook group. Lots of helpful folks there! https://www.facebook.com/groups/199790856831573/
Thanks to you for sharing this very lovely pattern ! It is quite difficult to find wool from Red Heart in France 🙁
But I’ll try ! I would appreciate to know the exact color reference of the one you used for the scarf in the lower right corner of the 3 photos (which is crossed on chest) … Regards
Pascale (Paris)
That one is made with Bistro ID# E793_3944 (the gray) and Stained Glass ID# E793_3943(the colors)
Thank you so Much Jessie ! I am going to try to find a place on @ to get this beautiful wool …
There is a link in the pattern to get the yarn on Amazon.
Great !!! 🙂
Beautiful scarf. Can’t wait for pattern
The pattern is in the post.
This is lovely! Will this work with Lion Brand’s amazing yarn?
I don’t see why not. I’m sure it would look quite nice. 🙂
Thank You for sharing! Can’t wait to make a couple!
Thank you so much Jessie. This is so pretty and love all the different ways to be worn…I love it. I like cascades. 🙂
Love this pattern. Thank you for sharing.
Hi Jessie, this is just beautiful but how do I know the names of the colors you used. I would like to make the first item up there. Also is it ok to copy the directions on my copier machine so I have it on paper? Are all the pictures from the same pattern? Sorry I’m a bit confused.
Hey Jessie, It’s me again….scratch all my stupid questions, I’ve just re-read everything and all the answers are right there. I was just glancing earlier. Sorry! 🙁
It’s all good, we have all done that at one point or another! 🙂
I am always looking for beautiful and unusual patterns, especially for family gifts. You nailed it with this one! Thank you.
Love the versitility.
Thank you for sharing this pattern. Love it.
I don’t know how to crochet. Do you think this is something I can figure out? Do you maybe have a video?
If you look at the menu at the top of this blog, there is a link for “Learn to Crochet”, there are videos there. Good luck, and have fun!
Question on the beginning of row 3, if you chain 7, then dc in the 4th chain, there are only 3 chains left. But it says to dc in the next 4 chains. Should there be one more chain, or should it be dc in the next 3 chains and the turning chain counts as the 5th dc?
Nice catch! My tester and I both missed that. I have fixed it so it should be clear now. You are right that it should have said next 3 chains and the turning ch counts as a dc. Thank you so much!!
Yay, that’s what I thought. It made the most sense. I just wanted to make sure. I’m happy to help.
This is beautiful and I can’t wait to make it for my brother-in-law’s girlfriend who loves wearing scarves! The hard part is picking the colors. Thank you so much for a great pattern. I’ll post a picture of the final product on Facebook when I complete it
I used tidal as the main color and parrot as the contrast. Everything was going beautifully until I was stumped by the instructions for Border Row 2. Do I work back over Round 1 then continue on along the side edge with the repeat part?Then do I stop at the foundation row, or should there be another sc 90 then pattern repeat to continue the border back to where I started Round 2? I guess I don’t know what you mean by top edge.
You make row 1 of the border, turn, make row 2 by first making a sc in each st of row 1, then you work the hdc & sc section across the edge of the scarf that has all the sc stitches.
Oh! The border row 2 is worked with sc along the last short side, then along the long side where the even rows began and the odd rows ended. So one long side will be even and the other will be jagged.
Yup!! 🙂
This is lovely! I am enjoying making it. I have never used this yarn before. Do I size it with plain water? Mine is really curling. Thanks so much for sharing. Hugs!
You can block with hot water or steam
Hi. Beautiful pattern! I do have a question. I’m confused about carrying color B in row 2. You have to do 5 sc then carry the color under the stitch for the rest. How is that done? Am I supposed to work over color B for the entire row?
You carry color B under the 5 stitches, that is all, just the 5 stitches, then you leave it.
Thanks!
I LOVE Red Heart Boutique Unforgettable so, so much, but have had a hard time acquiring certain colorways. That, plus, money is limited.. So, since I’ve had a mad obsession with the free pattern “Lorelei Shawl” on Red Hearts’ web site from the minute it came out, but lacked the skill set needed to make this gorgeous shawl, in the exact colorway used in the pattern.
I’ve accumulated enough in the “parrot” colorway to make the Lorelei Shawl, and am hanging on to it for dear life! But I also got echo, not realizing how much green would be in it. I’ve been stumped on how to use it, and what on until I saw your Skylark scarf!
Only problem is the contrast color. I just can’t use my “Parrot” for contrast! It took me too long to acquire enough of it for my shawl.
I ended up going with a solid in a sort of tanish gold (not yellow gold) from Caron Simply Soft and its kind of working. The problems I’m encountering are crocheting over color ‘B’, carrying the color by hiding it under the first 5 sc in color A. Its too large of a thread. It is very visible. So, I cut it…… Am I in big trouble now? The instructions for the border rows have me very confused. Does the border only have two more sides to it? The bottom fsc in color B having already been completed at the beginning of the pattern to the count of 90 stitches? Are we now creating the same idea, but across the top (last row) turning the corner and continuing down the length of the scarf on the inner edge, until we meet the already crocheted 90 fsc that we worked in the beginning.? Does that mean the outside edge of the entire length of this lovely Scarf will NOT be enclosed in a border? I cant seem to find a pic of the scarf, laid out flat for a view of the project in it’s entirety. Thank you so much!
You will have a LOT of ends to weave in, but you can cut the yarn if that is what works for you. As for the border, you can see more explanation in the replies to other questions, but yes, it only goes along 3 sides.
Hi Jessie,
I was wondering if the Color Bis supposed to be carried
all the way across Row 2?
Just under the 5 sts mentioned in the pattern
Hi Jessie,
I have tons of Unforgettable Sunrise. Can I use it as color A and B
Thx
Sure! Just make the pattern without changing color, and no need to carry the yarn where it is mentioned, as you are not changing color. It will all work just fine!
Wonderful!!! Thanks for the quick reply. I love your pattern. I can’t wait to get started. Thank you for your creativity!! 😉
I am an experienced crocheter but I am having a bit of trouble understanding what you mean in row 2 when you say “Turn, sc in each of the next 5 sts, carrying color B under the stitch, sc in each of the next 25 sts,” what do you mean by “carry color B. Thanks for your help with this and for this beautiful pattern too!
When you make the first 5 sts, you “catch” color B under them. Basically, your place color B on top of the previous row, and work the first 5 sts over top of color B. That way the yarn from color B travels those 5 sts without just dangling and looking messy. After those 5 sts, you stop working over color B, and just continue as normal.
Love it! Something different.
Lindo! Parabéns
I am a good crocheters but horrible at reading patterns. So my question is you carry B with the first 5 stitches. No problem. The You stop and leave 5 stitches Un worked. So on the odd rows are you going straight across & even leaving 5 unworked?
Also odd row at the end you chain7 and in the 4th stich you dc. And then you say in each of the next 4. Then dc in the next 25. I get it makes the 30 stitches but are you supposed to do something different in the first 5 than the 25? What happens to those big holes the chain 7? I am sorry I know this is easy. My mother in law tells me I make it more complicated then nessessary. As I do in knitting. Technically I am a knitters but you guys got some cute stuff. So thanks for you help.
There are 90 sts in every row. On the rows when you stop and leave 5 sts unworked, you added 5 sts at the beginning. The turning chain and the 4 dc make 5 sts, then you work over 85 st, 5+85=90.
thanks for the pattern
Hi Jessie,
Its me again! Do you have any instructiions on blockiing?
You can pin the scarf down and hover a steam iron over it (do not touch the iron to the fabric), or use a steamer. You can also soak it in hot water, and roll it in a towel, then squeeze the extra water out (do not wring it out), then lay it flat to dry. I used blocking wires and pins to hold it down, then steamed it with a steamer.
Hi Jessie — This is a beautiful pattern! I’m a beginner and feel like a total dunce, but reading through the pattern and the comments, it’s still not clear to me which yarn color combo is used in the photo where the scarf is wrapped around the body (more like a wrap than a scarf). It looks like you told another commenter that that combo is Stained Glass and Bistro, but that commenter’s description of the photo wasn’t all that clear to me, and looking at Stained Glass online, the yard doesn’t seem to have the same bold red and yellow in it. Perhaps that photo isn’t accurate. I’m sorry to be a bother, but could you please clarify? I’d be much obliged.
That is the stained glass and bistro. The color may be off in the photo, or the brighter colors may be on the inside of your skein. 🙂
c’est une très belle écharpe ou étole. Quel dommage que je ne connais pas assez votre langue, ce serait très long à traduire !!! Merci pour votre partage . MariaTeresa
Please explain “carrying the color under the stitch”
When working the stitch, hold the color yarn you are NOT using on top of the stitch you are working into so that the new stitch is formed over the other color yarn.
Can you direct me to a video on the blocking technique. Thanks
I don’t have one, you can search for one on YouTube.
I love your work
Thank you!
Should I be carrying B for five stitches in rows 4 and 6 also?
Rows 2, 4, and 6 are the same, so yes.
Love your patterns. Finished your wrap in blue and now working on this one. Got a question on the size. How did you measure to get 80″ × 11″? From.which corner to which? And I assume that is after blocking? Do you happen to remember the size before blocking as well? I almost finished the repeat Rows 2 – 9 for 7 more times and it looks a bit small………
Thank you. If your gauge is right, then you should be OK. The scarf is made at an angle, so it’s hard to measure it while you are making it. It’s measured across the top, and from top to bottom (which is where the angle is).
I was wondering what method you used to join a new skein of the Unforgettable yarn? I got the yarn and noticed it’s very slick and slippery. Tried the Magic Knot and it either pulled apart or broke. A Russian join pulled apart as well. I’d really like to use this yarn for this project but am stumped on what knot to use that will be reliable. Thanks!
I started new yarn at the start of a row and just wove in the ends
I’m working on this right now and just wondering if you have a picture of what it looks like laid out flat? And any other measurements you can provide?
If you click on the Ravelry link, there is a flat picture there. The measurements are in the pattern at the beginning.
I made this a couple years ago, and it’s my all-time favorite scarf. Thanks for the pattern!
I love that!! Thank you for letting me know. 🙂