Inside: This light and lacy crochet summer poncho free pattern is perfect for adding some boho flair to your look.
This pattern was originally published on 6/23/2016. The most recent update was made on 12/19/2022.
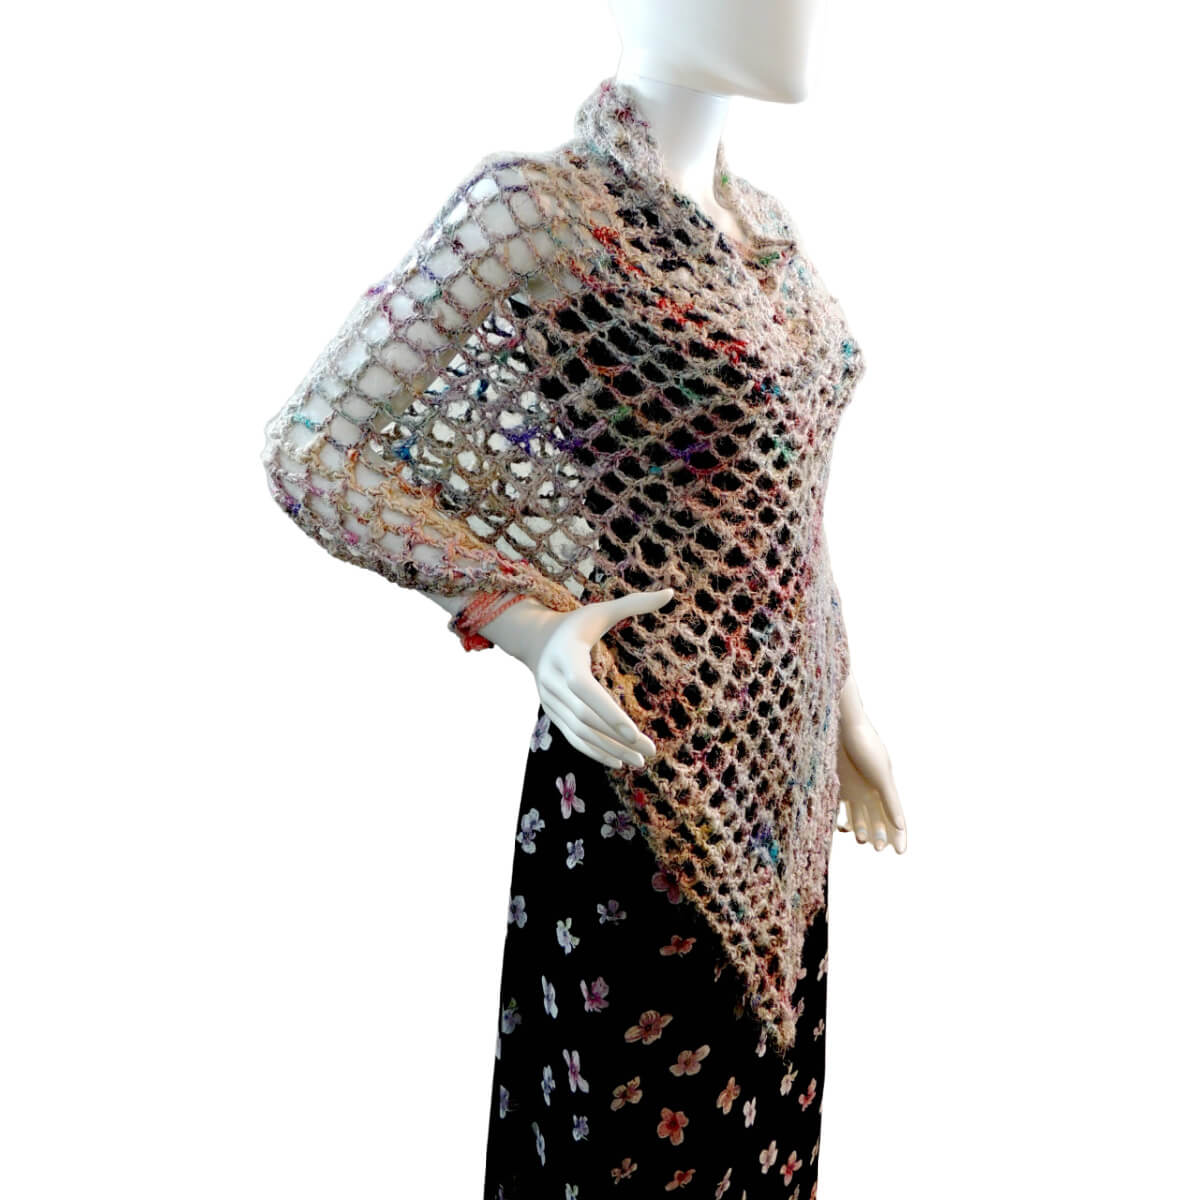
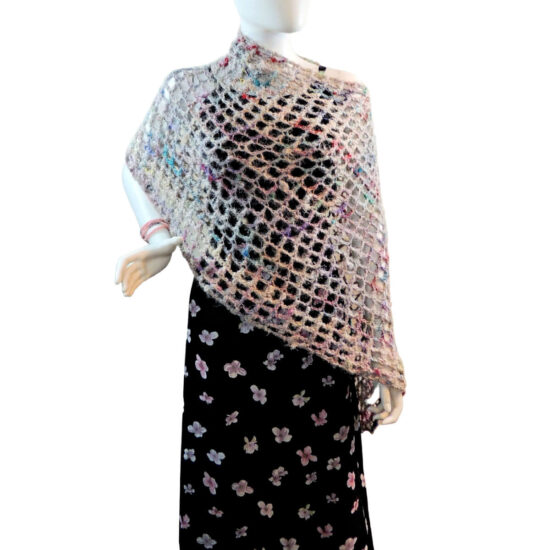
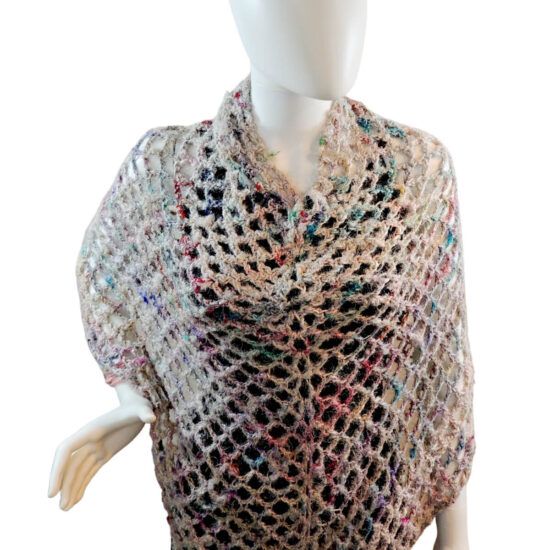
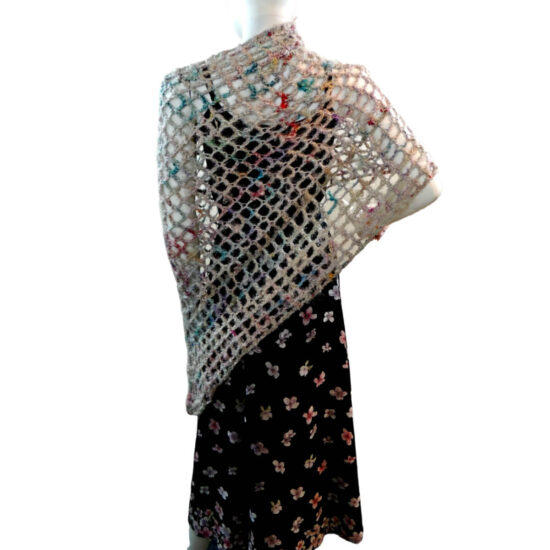
Add a touch of boho style to your summer wardrobe with our stylish Phoebe Crochet Poncho. This light and lacy design is perfect for those warm summer days. It’s easy to crochet, and makes a great cover up for the beach or a summer evening. Whether you’re spending a day in the sun or enjoying a night out, the Phoebe Poncho will keep you feeling cool and looking stylish.
Table of contents

Phoebe is a lightweight poncho that is perfect to dress up your summer wardrobe. It is quick and easy to make, so it’s a great beginner project. Phoebe is a poncho that only increases on one side, so it can be worn sideways for an asymmetrical look, or long in front and short in back.
Phoebe Poncho
Crochet Pattern
Easy Skill Level
Designed by Jessie Rayot
Supplies
Size
32″ at longest point
20″ at shortest point
Yarn
Frabjous Fibers recycled silk yarn used for sample
Color Pastel: 4 hanks (400 g/400 yds total)
-or-
size 3 or 4 yarn in a breathable fiber (such as silk, bamboo, or linen)
Crochet Hook
US I/9, (5.5 mm)
Gauge
Learn about gauge HERE
10-11 chains in 4 inches – a little variance is OK
Other Supplies
Stitches and Abbreviations
click on highlighted sts for tutorials
ch – chain
dc – double crochet
sl st – slip stitch
sp(s) – space(s)
st(s) – stitch(es)
Get the Ad-Free Printable PDF at These Sites
- Showstopper Creations (that’s me!)
- Ravelry
- Etsy
- LoveCrafts
Pattern Notes
- Read through all instructions before beginning.
- The beginning ch-4 and dc count as a (dc, ch2, dc) and are worked in the first ch-2 sp of the previous round. The rest of the double crochets are worked into the double crochets of the previous round. This means that every round has 2 more double crochets in it than the previous round.
Crochet Summer Poncho Free Pattern
Rnd 1: Ch 60 (your chain should be about 23″, if it is shorter, keep adding multiples of 3 until it is long enough), join with a sl st to form a loop, ch 4 (counts as first dc, ch 2), dc in same st, (skip 2, ch 2, dc in next st) around until 2 chs remain, ch 2, sl st to 2nd ch of beginning ch-4, sl st into ch-2 sp.
Rnd 2: Ch 4 (counts as first dc, ch 2), dc in same sp, ch 2, (dc in next dc, ch 2) around, sl st to 2nd ch of beginning ch-4, sl st into ch-2 sp.
Repeat round 2 to desired length.
Finishing
- Weave in ends
Happy Stitching!
FAQs
The ch-4, dc worked into the ch-2 space is your point or increase. It counts as (dc, ch2, dc), so that’s 2 dc. Then for the rest of the round you are working a dc in every dc of the previous round. This means each round has 2 more dc then the previous round.
It is also important that you sl st into the ch-2 sp at the end of every round so you are starting in the correct spot.
Increase or decrease the starting chain by a multiple of 3. Then follow the pattern and make the poncho as long or short as you want. I would suggest that after 3 or 4 rounds you check to be sure the neck opening is the size you want.
Did you enjoy what you found here at Jessie At Home? Then sign up for my newsletter and like my Facebook page, so you’ll get all the updates on new tutorials, other posts, sales, and coming events.
If you have any questions, want to share pictures of your work, or just want to chat with Jessie and other crafty individuals, than join one of our free Zoom Sit & Stitches. Find them on our Events Calendar.

© Copyright 2016 Jessie Rayot / Jessie At Home®, LLC All my videos, patterns, charts, photos and posts are my own work, so you may not copy them in any way. If you want to share this information with someone, then share the link to this post.


The Phoebe Poncho is so pretty – thanks for sharing!
Hi. I am trying to make this Phoebe shawl, but I do not know what I am doing wrong because I cannot get mine to be pointed in the front or longer than the back. Any advice is appreciated. Thanks!
It sounds like your missing the increase stitches.
On which round do ee make the increases…it did not say there ate increases to make.
If you follow the directions you are increasing in every round.
I’m looking forward to making this ! I find the simple patterns often look the most beautiful. thanks for sharing !
Hi Jessie – I am working on this beautiful pattern and can’t find where it says to increase – can you help me ??
The point is the increase, it’s the first st worked into in every round
I can’t help you becuz I am having the same problem. Row two, finished, shows no increase. It is a shame – I have done it three times – this is so beautiful and I really want to make it.
The increase is at the beginning of the round – Ch 4 (counts as first dc, ch 2), dc in same sp, This creates the increase, I’m not sure how to be clearer.
I have a question that pertains to this string. You say to dc into the same stitch or space would you be able to tell me the number of stitches or spaces from the hook?
It’s the stitch at the bottom of the hook, you don’t skip any.
Your pattern says:
Rnd 2: Ch 4 (counts as first dc, ch 2), dc in same sp, ch 2, (dc in next dc, ch 2) around, sl st to 2nd ch of beginning ch-4, sl st into ch-2 sp.
Why are you never stating anything about the sl st when everyone is asking you about the increase?
I’ve done patterns before and I’ve never been so confused cause after my 3rd try, it’s just not working. Seems everyone has the same problem.
Starting to think your pattern isn’t clear enough and perhaps it’s wrongly worded with the abbreviations.
In the first sp you work ch 4 and dc, which count as dc, ch 2, dc. That is the increase. This pattern is rather old and is on my “tweak this” list.
Hello
I just love your poncho.
I’m a starter and would like to do this model for my 9 years old daughter.How many chains should I start with ?
mustn’t the ” net holes ” that we create be smaller ?How can we change that?
Can you help me?
Thank you
You can decrease the number of stitches by 3, 6, or 9, but I wouldn’t go much smaller. Then just make it to the size you want by stopping when it is big enough.
Just a iovely shawl. I’m working on one similar right now. I’ll try your pattern on the next one I make. Thanks for sharing
Hi, can I confirm that this is US Double crochet, please?
Yes, it is US
I really like your patterns–I will be giving this one a try–soon–
My 10 ch giving me only 2 inches. how many I should ch?
You need a bigger hook or thicker yarn or both. – or you can just double everything.
After I dc in the sp I should dc on the second ch of the V?
You ch 5 (which counts as dc and ch 2) then you dc in the same sp. Next you dc in the next dc.
Thank you. I’m working on it and it’s looks great!!!
I see one box increases every row. Do I have to see two boxes increases?
This poncho only increases in the front, so it sounds like you are on the right track!
Your pattern says “4” not “5.” Please confirm, which is ideal to obtain the lovely look of the piece in your pictures. Is this why my center “point” is slanting to one side/angle?
Follow the pattern, I must have made a typo in the comment. If you center is slanting you must be increasing on only one side of the center, make sure you are following the pattern.
The center line looks like an angle line, in your picture it’s looks straight. Please let me know how it should looks.
The center should fall straight down, it is the point of an equal angle, so there is an increase on both sides of the center.
How do you increase on both sides? When I get to the end of the row I sl st and dc in the sp then I dc in the next dc. I get an angler line.
Ch 4 (counts as first dc, ch 2), dc in same sp,
That is the increase. The first 2 chain count as a dc, then there is the ch 2 which is the center front, then one more dc – this gives you an increase of 1 dc on each side of the center front ch-2. The rest of the way around you dc in each dc and ch 2 between every dc.
Why there’s no sl st (slip stitch) mentioned like the pattern?
I’m not sure what you’re asking here.
Do I work this pattern in circles with joining each rows with a split stitch or in lines back and forth till the very end then stitch together?
It’s worked in the round.
I’m assuming you won’t help me by deleting my questions. That not very nice since I’m stuck without knowing!
You posted 2 questions last night after I went to bed. Comments have to be approved on my site, and I usually only do that once a day. So I just approved those 2 questions. Nothing was deleted.
I sent a comment two days ago and don’t see it so I’m trying again in case it just didn’t go through. I can’t figure out which yarn to use. The silk yarn mentioned doesn’t give a weight. I also saw Bulky (5) weight, which seems kinda heavy for this. I was hoping to use a cotton yarn since it’s for my sister in Florida. Thanks!
You could use a cotton yarn and be fine. You’ll just want to make sure that the neck hole is the right size, and then you can make it as long or short as you want. 🙂
So I should find a (5) Bulky/Chunky cotton yarn? That weight seems very thick. What I’m really not sure about is the size and type yarn I need. Even if I try a silk yarn, I’m still not sure what thickness works best. Will this work?
From Etsy: 100% recycled Sari Silk Yarn, Red with flecks of multicolour
100 grams
3 or 4 (DK or Worsted) should work, as should what you found on Etsy. Just be sure to check the neck opening after round 2 or 3. If it’s too tight, you’ll need to pull it back and make it longer.
This is so pretty! I can’t wait to make it. I make all sorts of everything then give them to my daughters. They never know what I’m going to make next.
I love that!!
Hello I’m just starting this pattern and I was wondering the best way to make it for a larger sized bust , and person. Thanks so much! Also when will the “point” start to show I am doing the ch 4 , dc in same stitch at the start of each row.
The point is made in every round, but it gets more obvious the longer it gets. For a larger size, just make it longer, it will go around just fine, but it will need to be longer.
you are super patient. i read this entire comment section. ppl are brutal: demanding and afraid to take risks.
Thank you. I try to be clear with my patterns, and when I get a lot of similar questions, I do try to edit the pattern to make it clearer. Making a video for this one is on my to-do list. It’s one of my most popular patterns, so there are hundreds of people who have made it, which means some are going to have questions. 🙂
I’ve been looking for a beginner friendly summer poncho pattern – can’t wait to give it a try. Thank you so much !
hi, i’m thinking to make this in crochet thread (i think it’s size 10?), variegated green/purple with random stripes in green and purple, i understand how to increase beginning round to get it to fit, no problem there and i find your directions very clear. can you recommend a needle size, i’m thinking maybe C? also thinking maybe beginning with fsc to give neck edge a little more stability? TYIA
I completely agree that starting with fsc would be a great idea! I’ve been thinking of doing that when I make the video to go with this pattern (you know, in all my free time 😉 ). A 2.75 mm (US C) should work. Make a little swatch and see if you like the look and feel. You could even change the double crochets for trebles or double trebles and add an extra chain between them if you find the holes are too small for your liking. Just remember if you make the stitches taller you’ll need to add another chain or two at the start of each round to get to the right height.
Happy crocheting!!
Thanks for the notes regarding sizing up on the spaces if needed, i would’ve gotten there … eventually, but thanks to you i’ve already got a solution if needed. i’ll be starting on this shortly, as soon as i finish another project. i can hardly wait!
You’re welcome, happy stitching!
What is the weight of the yarn? Looking to see if I have something suitable in my stash.
Worsted or DK. The thinner the yarn, the more lacey the stitches will be.
I really want to make this but I am a visual learner. Do you have a video of this?
Not yet, but it is on my list.
Can this be worn short in the front with the point in the back
Go for it!!