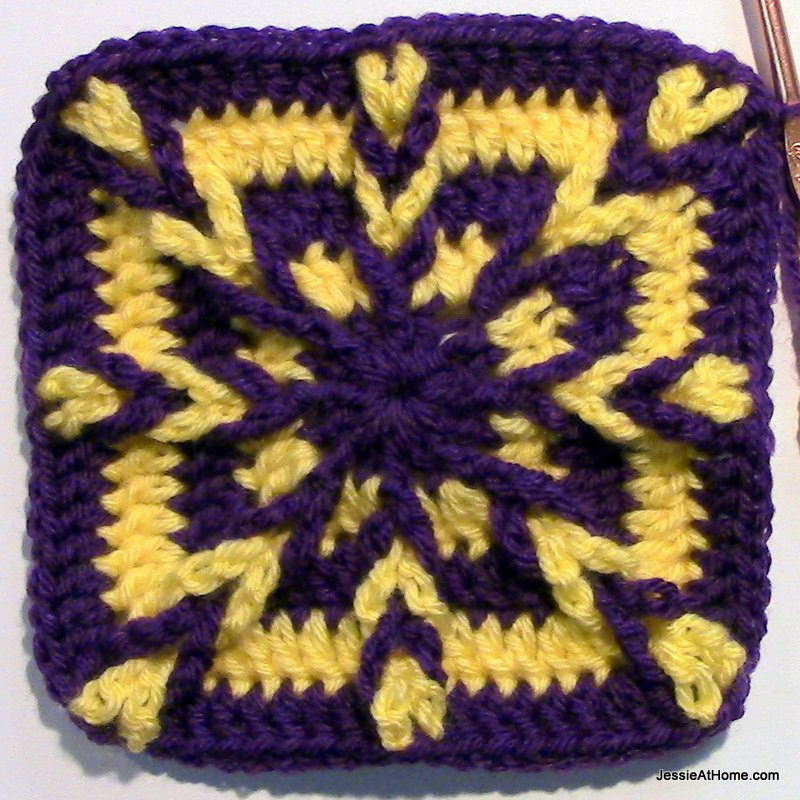
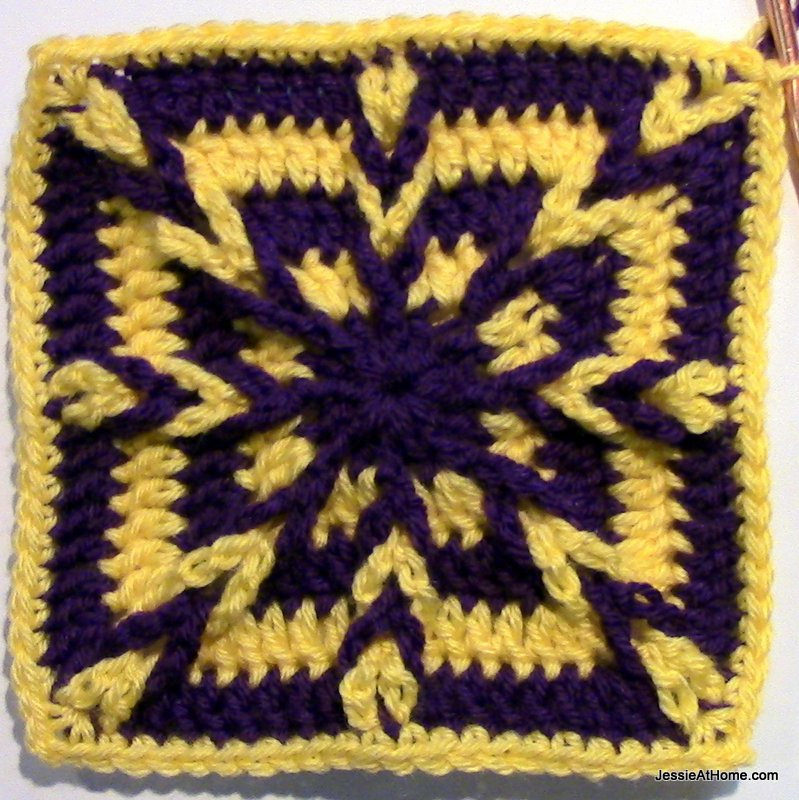
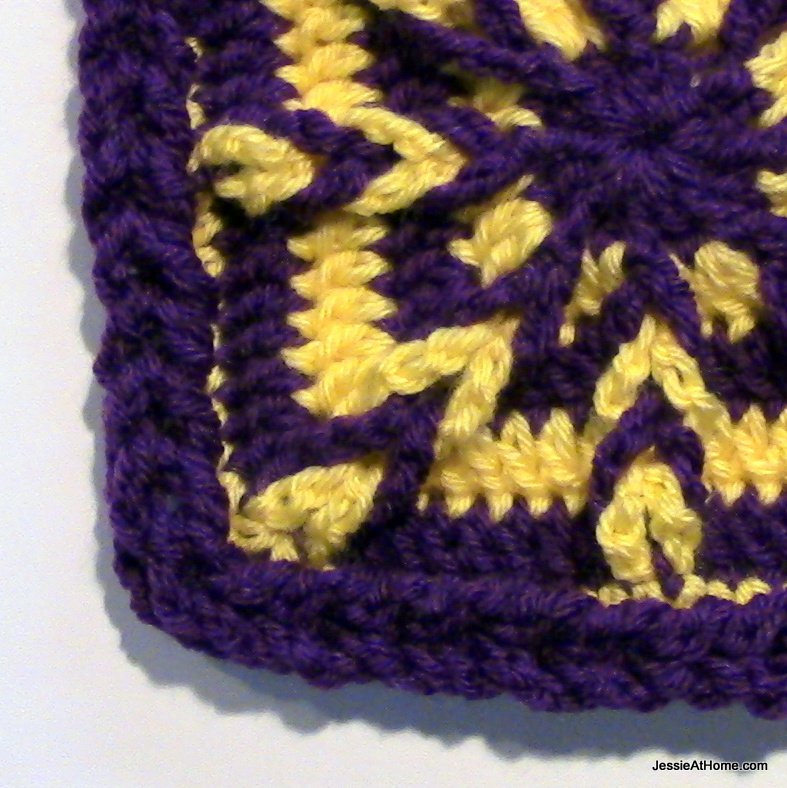
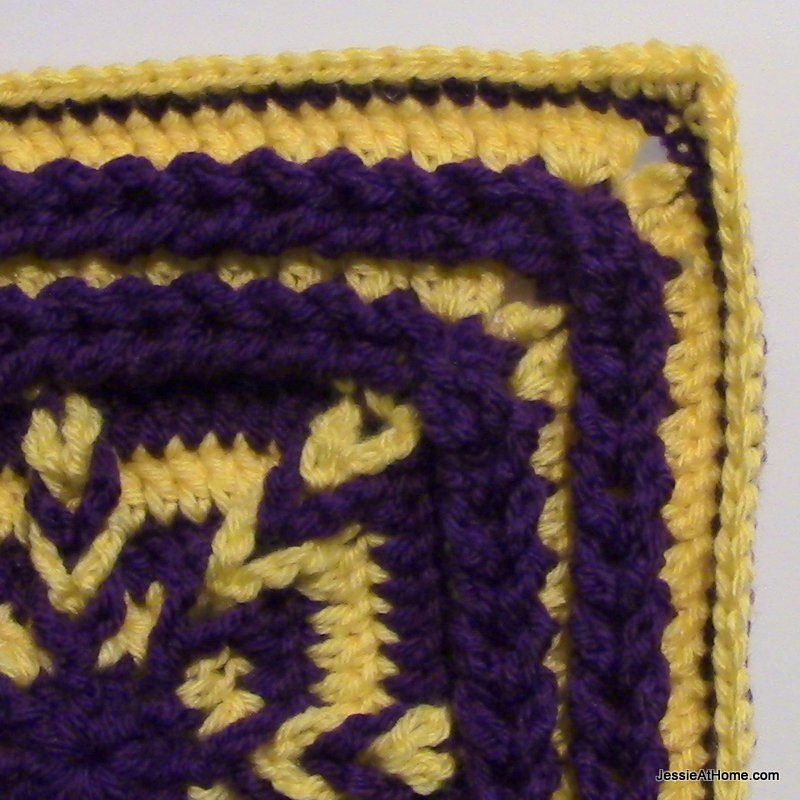
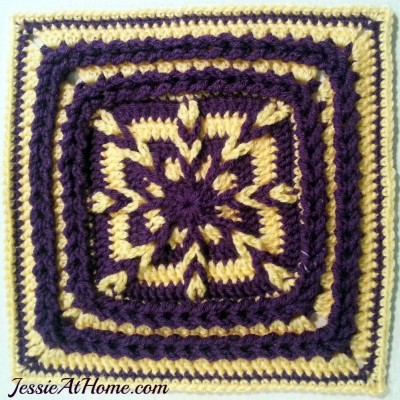
Tamara’s Kismet Square uses the traditional Jacob’s Ladder stitch in the center, and is bordered by the Jacob’s ladder stitch flipped on its side. This creates a lot of fun texture and a really nifty~looking square, if I do say so myself. 😉 The idea for turning the Jacob’s ladder stitch on its side came from this awesome pattern. The square can be used in blankets, pillow covers, as wall art, or in some other way you can imagine. You can even make a quick baby blanket with 6 of these squares and a border, it works for boys or girls. Just have fun with it!
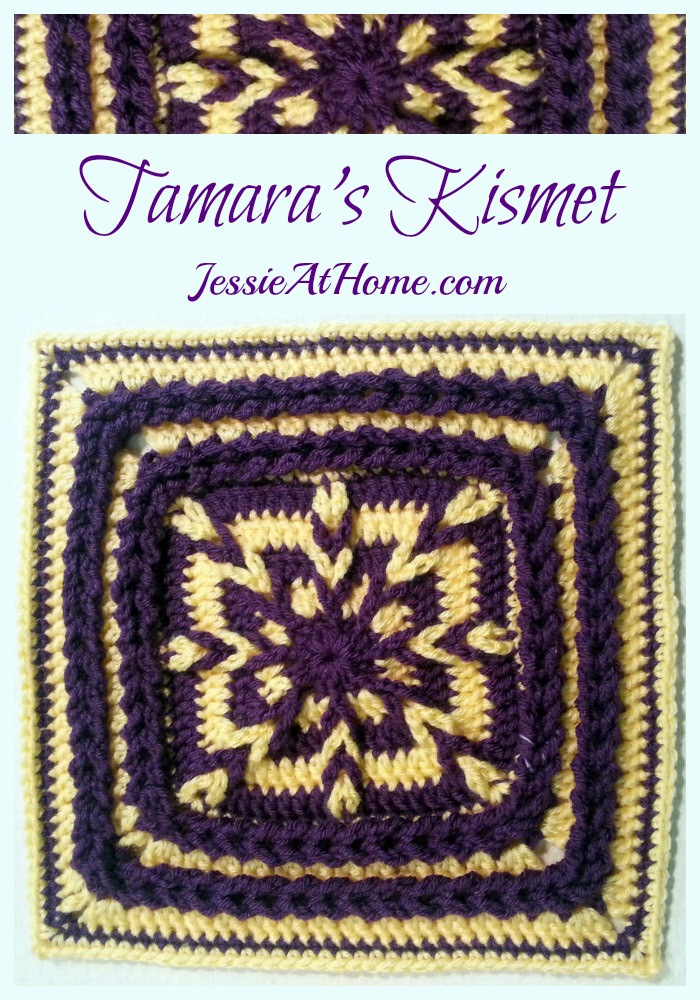

Tamara’s Kismet Square
Free Crochet Pattern
Intermediate Skill Level
Designed by Jessie Rayot
After creating the 6″ Jacob’s Square and the 12″ Kismet Square built off of it, and making quite a few of each square (more on the reason for that next week), I had some ideas for another version. There was a slight edit I wanted to make on the first round, and then a fun different look for the top. That is where Tamara’s Kismet square came from. Do you want to know how it got its name? Well you will have to wait until the new year to find that out!
This pattern has been translated into Dutch!!
Dit patroon is (door HET HAAKBEEST) in het Nederlands vertaald. Je vindt een versie met foto’s voor rechtshandigen MooglyCAL 2015 – 1 -rechtshandig, eentje met foto’s speciaal voor linkshandigen MooglyCAL 2015 – 1 – linkshandig en een printerversie zonder foto’s MooglyCAL 2015 – 1 -full text.
Size:
12” square when made in the gauge listed.
Yarn:
Lion Brand Vanna’s Choice
Hook:
US 9/I/5.50mm
Gauge:
13 sts and 6.5 rows in a 4” square in double crochet
Other Supplies:
Yarn needle
Stitches and Skills used:
ch – chain
sl st – slip st
sc – single crochet
dc – double crochet
Special Stitches:
qtr – Quad Treble Crochet: yo 5 times, insert hook into stitch, yo, pull through stitch (7 loops on hook), [yo, pull through 2 loops] 6 times.
Getting Started:
Here is a tutorial (including a video) showing the Jacob’s Ladder technique.
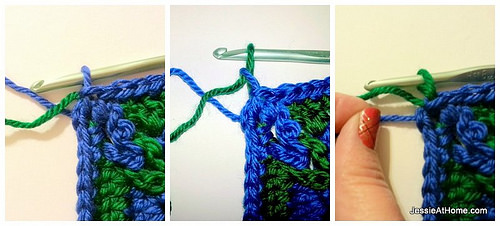
For this project, I alternated colors every round. You can use whatever color scheme you like. To change colors, I used a pull~through method for changing colors. I finished each round as written, when I started the next round (if I was changing colors), I pulled a loop of the second color through the first, I then pulled the first color very tight, hiding the last loop of the first color, and essentially replacing it with the loop of the second color.
Pattern:
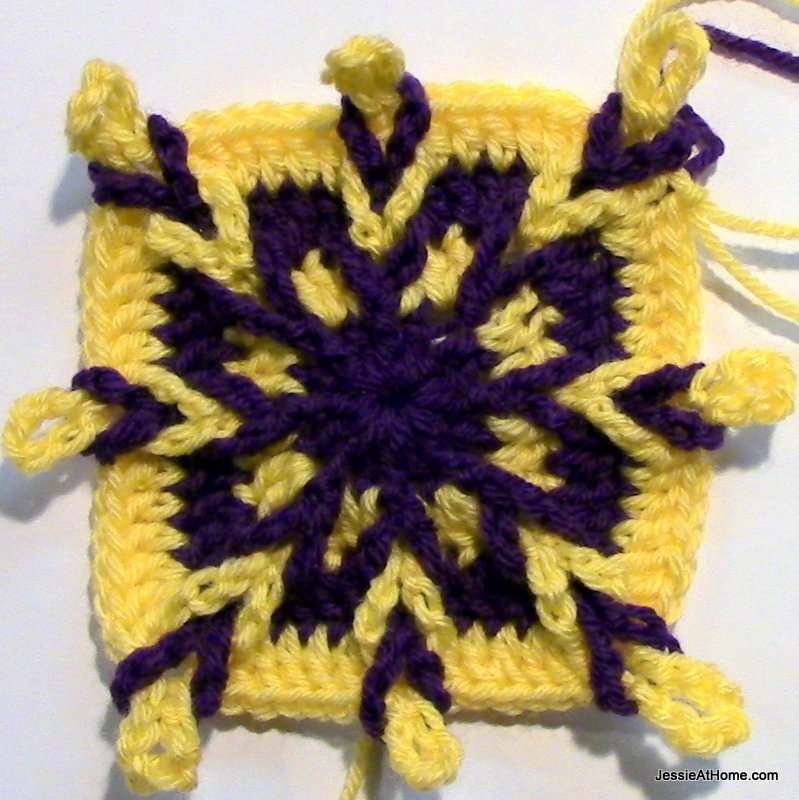
Round 1: Ch 3, sl st to the first ch made to form a ring, ch 12 (counts as first dc and ch 9) 2 dc in ring, ch 7 (2 dc, ch 9, 2 dc, ch 7) 3 times in ring, dc in ring, sl st to 3rd ch of beginning ch 12. ((2 dc, ch 7, 2 dc) on each side, ch 9 on each corner)
Round 2: Ch 12 (counts as first dc and ch 9) 2 dc in next dc, dc in next dc, ch 7 (dc in next dc, 2 dc in next dc, ch 9, 2 dc in next dc, dc in next dc, ch 7) 3 times, dc in next dc, dc in same st as the join of the last round, sl st to 3rd ch of beginning ch 12. ((3 dc, ch 7, 3 dc) on each side, ch 9 on each corner)
Round 3: Ch 12 (counts as first dc and ch 9) 3 dc in next dc, dc in each of next 2 dc, ch 7 (dc in each of next 2 dc, 3 dc in next dc, ch 9, 3 dc in next dc, dc in each of next 2 dc, ch 7) 3 times, dc in each of next 2 dc, 2 dc in same st as the join of the last round, sl st to 3rd ch of beginning ch 12. ((5 dc, ch 7, 5 dc) on each side, ch 9 on each corner)
Round 4: Ch 12 (counts as first dc and ch 9) 3 dc in next dc, dc in each of next 4 dc, ch 7 (dc in each of next 4 dc, 3 dc in next dc, ch 9, 3 dc in next dc, dc in each of next 4 dc, ch 7) 3 times, dc in each of next 4 dc, 2 dc in same st as the join of the last round, sl st to 3rd ch of beginning ch 12. Pull up the loop on the hook to make it longer, and remove hook. ((7 dc, ch 7, 7 dc) on each side, ch 9 on each corner)
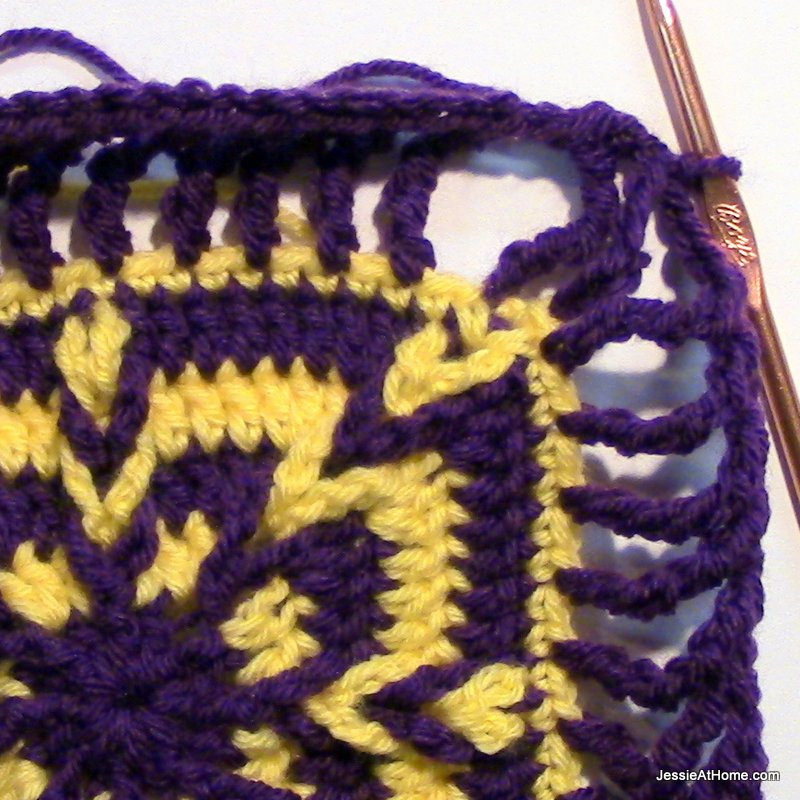
Loop Ladder: Twist a ch space from round 1, ½ turn, pull the ch sp above it in round 2 through the loop, pull the ch sp above it in round 3 through the loop, pull the ch sp above it in round 4 through the loop. Repeat for remaining 7 ladders.
Here is a video to show that:
And here are some photos to help as well:
Round 5: Ch 3 (counts as first dc) (2 sl st in next ch loop, 3 dc in next dc, dc in each of next 6 dc, sl st in next ch loop, dc in each of next 6 dc, 3 dc in next dc) 3 times, 2 sl st in next ch loop, 3 dc in next dc, dc in each of next 6 dc, sl st in next ch loop, dc in each of next 6 dc, 2 dc in same st as the join of the last round, sl st to top of beginning ch 3. ((9 dc, sl st, 9 dc) on each side, ch 2 on each corner)
Round 6: * work over slip stitches and into the top loop from the loop ladders when working in the corners for this round* Sl st in corner sp, ch 3, sc in corner sp, (sc in each of next 19 sts, (sc, ch 2, sc) in corner sp) 3 times, sc in each of next 19 st, sc in corner sp, sl st to first ch-3 sp made. (21 sc on each side, ch 2 on each corner)
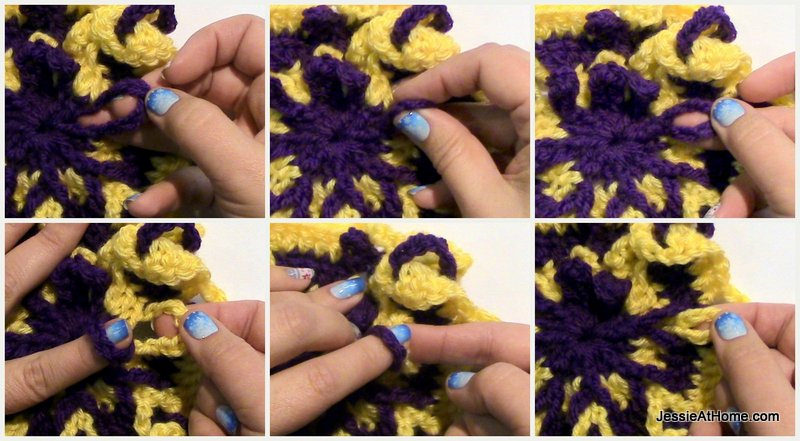
Round 7: Sl st into ch-2 corner space, ch 9 (counts as first qtr and ch 2), * qtr in first sc after ch-2 corner, (ch 1, skip 1, qtr in next st) 10 times, ch 2, qtr in ch-2 corner, ch 2, repeat from * 2 more times, qtr in first sc after ch-2 corner, (ch 1, skip 1, qtr in next st) 10 times, ch 2, sl st to 7th ch of beginning ch 9. (11 qtr on each side with ch-1 between them, (ch 2, qtr, ch 2) on each corner)
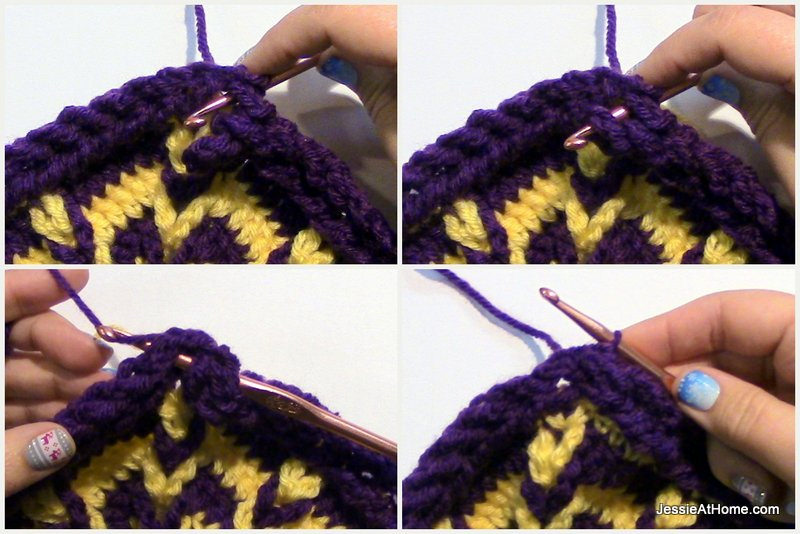
Loop Ladder: Twist first qtr from round 7, ½ turn, * pull the next qtr through the loop, repeat from * around until all the qtr have been pulled through.
Here is a video to show that:
And here are some photos to help as well:
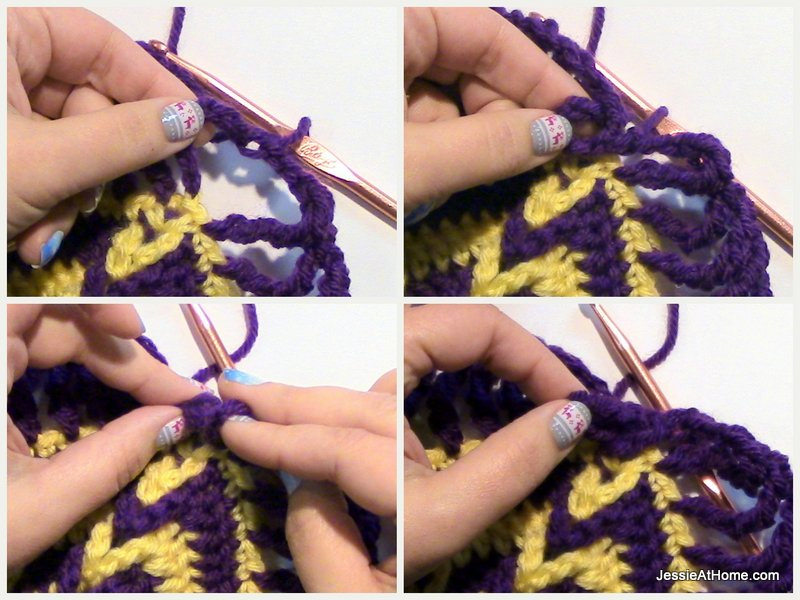
Insert hook from behind work, under the ch 2 and through the last qtr loop, insert hook back down to over the loop, and through the first qtr loop made, yo, pull through everything on hook. This will tack down the last loop. See the photos for step by step help.
Round 8: Ch 5 (counts as first dc and ch 2), (3 dc in ch-2 space, 2 dc in each of next 10 ch-1 spaces, 3 dc in ch-2 space, ch 2) 3 times, 3 dc in ch-2 space, 2 dc in each of next 10 ch-1 spaces, 2 dc in ch-2 space, sl st to 3rd chain of beginning ch 5. (26 dc on each side, ch 2 on each corner)
Round 9: Sl st into ch-2 corner space, ch 9 (counts as first qtr and ch 2), qtr in same ch-2 corner space, ch 1 * qtr in second dc after ch-2 corner, (ch 1, skip 1, qtr in next st) 12 times, ch 1, (qtr, ch 2, qtr, ch 2, qtr) in ch-2 corner, ch 1, repeat from * 2 more times, qtr in second dc after ch-2 corner, (ch 1, skip 1, qtr in next st) 12 times, ch 1, (qtr, ch 2) in ch-2 corner, sl st to 7th ch of beginning ch 9. (13 qtr on each side with ch-1 between them, (qtr, ch 2, qtr, ch 2, qtr) on each corner)

Loop Ladder: Twist first qtr from round 1, ½ turn, * pull the next qtr through the loop, repeat from * around until all the qtr have been pulled through.
Insert hook from behind work, under the ch 2 and through the last qtr loop, insert hook back down to over the loop, and through the first qtr loop made, yo, pull through everything on hook. This will tack down the last loop.
Round 10: Ch 5 (counts as first dc and ch 2), (3 dc in ch-2 space, 2 dc in each of next 14 ch-1 spaces, 3 dc in ch-2 space, ch 2) 3 times, 3 dc in ch-2 space, 2 dc in each of next 14 ch-1 spaces, 2 dc in ch-2 space, sl st to 3rd chain of beginning ch 5. (34 dc on each side, ch 2 on each corner)
Round 11: Sl st in corner sp, ch 3, sc in corner sp, (sc in each dc to corner, (sc, ch 2, sc) in corner sp) 3 times, sc in each dc to corner, sc in corner sp, sl st to first ch-3 sp made. (36 sc on each side, ch 2 on each corner)
Round 12: Sl st in corner sp, ch 3, sc in corner sp, (sc in each sc to corner, (sc, ch 2, sc) in corner sp) 3 times, sc in each sc to corner, sc in corner sp, sl st to first ch-3 sp made. (38 sc on each side, ch 2 on each corner)
If you enjoy what you have found here at JessieAtHome, please like my Facebook page to get all the updates on new tutorials, other posts, sales, and coming events.
If you have any questions or concerns, want to share pictures of your work, or just want to chat with Jessie and other crafty individuals, than join my Facebook group.
If you enjoy this free crochet pattern, please consider buying some of your supplies from one of these affiliate links. Thank you.
Did you enjoy what you found here at Jessie At Home? Then sign up for my newsletter and like my Facebook page, so you’ll get all the updates on new tutorials, other posts, sales, and coming events.
If you have any questions, want to share pictures of your work, or just want to chat with Jessie and other crafty individuals, than join one of our free Zoom Sit & Stitches. Find them on our Events Calendar.

© Copyright 2014 Jessie Rayot / Jessie At Home®, LLC All my videos, patterns, charts, photos and posts are my own work, so you may not copy them in any way. If you want to share this information with someone, then share the link to this post.


the kismet square is just beautiful! thank you so much 🙂
I believe there is an error in RND 3: third line in the parentheses says “dc in each of next 3 dc, ch 7)”. Should say “dc in each of next 2 dc”
You are right! I fixed it. Thank you so much for pointing that out. <3
Hi Jessie-
Love your patterns! Tried to bring up the printer-friendly version of the pattern for the CAL, but the craftsy link had a 404 error. Just thought I’d let you know!
Hmm, I checked it and it worked. I asked some other people to check as well. Maybe it was a temporary Craftsy issue, or maybe a server issue on your end.
Is color change every round
That is what I did, but you are welcome to play with the color in any way you see fit.
hi I’m relatively new at reading patterns so the first instructions say ch 12 (Counts as first dc chain 9) do I ch 9 or 12?
You chain 12.
Why do you have chain 9 there also? Confusing.
You chain 12 – the ch 12 counts as a dc (the first 3 chains) and a ch 9 (the last 9 chains). It’s there because it’s common to explain when chains are used to count as a first stitch, such as a ch 2 for a hdc or a ch 3 for dc.
Thank you for this wonderful pattern, beautiful! I will definitely be making something with these at some point x
I feel like such a noon right now.lol In round 1 at the end (after the slip stitch into the 3rd ch of beginning ch 12) it says ((2dc, ch 7, 2 dc) on each side, ch 9 on each corner. ) I have what appears to.be an 8 petal flower. How do I know what counts as a side and what counts as a corner? And since this is still round 1 I don’t change colors yet right?
The ch 9s are the corners. If you want it to change colors like mine, change every round, but you can make the color pattern any way you want.
Hi! I’m really enjoying this pattern so far and I’m doing it as part of the Moogly Crochet-along, but I’m at round 9 now and my stitches aren’t lining up. So when I look back to round 8 I think there’s an error. At the end it says “24sc…” should be on the sides, well the round was done in DC and I have 26 stitches. Just wondering if you can help sort out my confusion. Thanks in advance!
I just fixed it, the stitch count was wrong! You are correct in your sts, there should be 26.
I don’t know if I can articulate this so that it makes sense. In round 8. If I startbwith a chain that counts as a dc…..then I end with three dc on the last side, will that not be an extra stitch?
Also, the stitch count says 24sc. At the end. I know you probably meant DC but I’m not getting 24…. Can you help me understand?
Many thanks!
Melanie
Oh, my. I fixed it. There should be 26 dc on each side, you most likely did everything correct.
Thanks!
I love this square– working on it now. Also just wanted to say that I so appreciate that youre wearing jamberrys!! 😀
Thank you! I love that they don’t chip. When I paint my nails I have to constantly touch them up when I want to make a video. With the jamberrys I am video ready for a week or two! (No, I don’t sell them, I just like them)
I sell them and that was the main reason I got them. my nails would look horrible by the end of the day from typing and crafting. 😀
I do, and I just LOVE that wrap! It’s so cool to see them on fingers now and again 🙂
I cant get the tension right is it DK wool with a 5.5mm hook? I find 5.5 rather big already for DK and my Tension came out too small and so to go up a bigger hook would make it very loose. I’m wondering if I should use Aran or even chunky. Can anyone help please. xx
Vanna’s Choice is worsted weight, so it is worsted weight with a 5.5mm hook. You can certainly change things as you see fit, it may just change the finished size.
I’m using Aran (in UK)…. good luck!
I found and printed a no pictures version. How can I print full pattern with the pictures?
I don’t have an option for that, as most people don’t want it. You should be able to just highlight it and copy it to a word doc if you want the pictures.
Do you think this would look good in a single color?
Absolutely! All the texture makes it great for a solid color. I have been thinking of a blanket in solids with this one. 😉
I don’t understand the last part of round one.
I’m not sure what you mean. What don’t you understand?
I am not sure what I am doing wrong, but I cannot find an English version of a printer friendly copy of the pattern. I can only find one that is in Dutch. I struggle enough reading English patterns, I think I would be really lost reading a Dutch pattern.
At the end of the pattern, just above the Ravelry link, there is a short paragraph with a link to the printable version.
When changing colors for each round, do you cut and weave in ends for each round, or do you carry the colors up the back?
I carried mine
Good! That’s what I wanted to hear!, lol 🙂
I don’t understand the last sentence in round 1. ((2 dc, ch 7, 2 dc) on each side, ch 9 on each corner) I don’t understand what and where is the side. And I don’t understand where and where is the corner. Right now I have a flower. Please help.
The period (.) ends the round. The part after the period is the round count. It tells you the sts you should have on each side and each corner. It looks like a flower for a while. Watch the first video and you will see what happens to make it not a flower.
Ok so you are saying that is it. The first round is the flower. Next go to round 2. The last sentence is what you should have already crocheted?
It may LOOK like a flower, yes. The part in the parentheses after the period is what you should have done. It is the stitch count.
I am slightly confused on round 5. It says 2 sl st in next loop (which is the ch 9 loops, or the corners) but at the end of the instructions it says there should be a ch 2 on each corner.
Could you please clarify this?
If you did the 2 sl st in the corners, then you did it right.
This is really beautiful.
I have never made anything like this before so I’m not sure what to expect. I have completed row 5 and my work looks very ruckled up compared to yours. I this OK at this stage and will it flatten as I complete the square? Or should I start again and work looser?
It’s hard for me to know without seeing it, but I would keep going. If you are part of the Moogly CAL there is also a Ravelry group where you can get help, or you can join my Facebook group listed in the post, that way you can post a picture and get more help.
I loved doing this so much I have made two. I am using three colours which I will mix up but each square will have the last row in the same colour to give neatness when sewing up. Also I have learnt a new technique in the braid effect.
Thank you for doing this.
Wonderful! The Jacob’s Ladder stitch is one that has been around for a long time, but the first time I saw it turned on it’s side was when Tamara (Moogly) did it.
Thank you. Lovely pattern how do I print it so I can work away from computer.
I am not computer savy, I have just been tapping stuff looking for the print button.
Please help.
Just above the Ravelry button is a link to where you can print it.
Great job; lovely pattern! Thank you so much for all you have done for everyone!
(‘ w ‘) crochet chick
I think my favorite part of this was seeing your Jamberry nails on the video!!
How do I download the pattern to a file for later use?
There is a link above the Ravelry link for a printer friendly pdf. You can download that, or you can just bookmark the post, or queue or favorite the pattern on Ravelry.
I think there is an error in round 9. It says vat beginning to CH 9, but last step tells you to join in 6th CH of beginning CH 8. BEAUTIFUL DESIGN, though!!!
Got it, thanks!!
I’m working on your beautiful square & had a question on round 10. It says I’m supposed to have 2 dc in the next 14 ch-1 spaces. I only see 13 spaces. I believe I had the correct # of qtr before doing the loop ladder. Am I doing it correct?? Thanks
There should be 14 ch-1 spaces.
Thanks so much!! Got it!
Thank you so much for such a pretty square! I guess my stitches are just larger than most. I’m on round 9 and have 13 inches.
If you are using a larger hook, a larger yarn, or a looser tension, then your square will be bigger. If you are doing the Moogly CAL then the important thing is that you use the same hook, yarn, and tension throughout. All the squares will end up the same size that way.
Round two when you say dc in next dc, it’s the “next” dc the loop that was created the previous round? Or am I going around that loop with the chain and dc into the dc that’s in the ring?
I really need to know where you are in the pattern to be able to answer your question.
Hi Jessie, I am doing the Moogly 2015 CAL, have just finished kismet square, thank you for your clear instructions and videos, enjoyed trying the different techniques used.
I have been working on your Tamara’s Kismet Square for 2 days now and each time my squares will not straighten out. Are my stitches still too tight and too small. I have never had this problem before until this square. Can I go up to a J hook?
Yes.
Absolutely adorable. Can’t wait to use this concept.
I’m having trouble getting past the first two rounds. Am I supposed to sl st before the 2nd round? Is the 12 supposed to be the 4th corner?
I take back my last comment. I’m not paying attention apparently.
It’s all good. 🙂
Ok I made it to round 8. I chained 5 , then it says (3 dc in ch-2 space, 2 dc in each of next 10 ch-1 spaces, 3 dc in ch-2 space, ch 2) 3 times, I am trying to figure out where to start the 3dc. Is ch-2 space the corners? I wish you had a picture on how to start the round instead of it already finished. Or rally a picture of both. Plus it is hard to see how you ended round 7 because the yarn is so dark. I’m sorry if I’m being a problem. I just really want to accomplish this square. My square is turning out very pretty.
Try watching the videos, it is all shown there.
Ok I did! I didn’t realize there was a second video. This really helped me!! Thank you so much.
Also I would like to know how big is your square at this point? Mine looks bigger. The whole square will measures 12 inches, right?
Yay! Glad it helped. My whole square was 12″, but as long as you use the same yarn and hook for all the squares, they will all fit together. If you have a larger hook or yarn, or a looser gauge than me, then yours will be bigger, but so will all the other squares you make for the CAL, as all the squares have about the same number of sts in the final round.
I finally got it and finished my square! I’m so happy! Thank you for all your help, sorry I was such a pain!
Thank you for making this beautiful square for the 2015 Moogly Afghan CAL. I love discovering new to me designers through collaborations like these. I’ve liked your FB page and will be following. Namaste’
Thank you. I really enjoy working with other bloggers/designers, and it is always nice to gain new followers. Welcome!
I am already confused on round 2. Chained 12, the it says 2dc in next dc, which I am thinking is the dc next to where I chaine 12. Then it says dc in next dc, which I see as padt the loop on the prior round into the next set of 2 dc, am ireading this coorectly, it just looks like I am skippong the loop on the prior round.
Each round will have the sets of loops hanging free. It looks a mess until you loop everything. If you watch the first video, it may give you and idea of what it should look like. You will have a ch 9 on each corner, and a ch 7 in the middles of each side, with dcs in between.
Great pattern! I didnt find it that hard….but the qtr were tedious!
I know!! They seem to go one forever! 🙂
I was viewing your pattern of the kismet square because it was listed under your free patterns ,but then at the bottom it says you can not copy this pattern or any of your patterns so I’m confused can you copy or not . free says free to me why are they written if they are not free. confused
You can print it off for your own use. You can not make copies of it to hand out, or copy it and repost it elsewhere. People need to come here to get the pattern. It is free to you but I still get paid. You see the ads on the page? I get paid when you come here for the pattern, because you see the ads. If you buy something from one of the ads I get paid more. This is what enables me to provide the patterns for you at no cost to you. If I did not get paid (because people were getting the pattern somewhere else) I would have to sell my patterns instead.
Does that help you understand what I mean by copy, and why?
I think the first four rounds were tricky but the rest of it came together well. a very pretty square.
Hi, I am using chunkier wool for this pattern and at round 8 my square is 101/2 inches don’t know whether to do round 9 then 12 or just go to round 11 and 12 what would you recommend?
It really doesn’t matter as far as the pattern goes, it only matters for what you are using it for. If you need it to be a certain size, then stop early. If you are fine with it being bigger, then don’t. If you are making the Moogly CAL, then I would say to go to the end, and be sure to use the same yarn and hook throughout all the squares. I would not stop early if you are doing the CAL, as some of the other squares may not be made in such a way that you can stop at the same point. However, they are all made to be the same size, so if this one ends up being 14 inches for you, then the rest should as well.
Great, it is for the CAL thanks for your help.
Thank you for including me.
I have tried to do the first quadtrc round 3 times. Everytime the quadtbc have loose loops on them so it looks messy when i i loop them through. Any tips on how to make them neater?!
It does happen, you just have to try to remain loose at the bottom of the stitch so that all the yarn for the loops does not bunch up at the top.
I wish this was in a printable format without the excess waste of ink.
It is. Click the link at the bottom of the post that says “For a printer friendly version of this pattern…click here…”
I found the print friendly link. Thank you so much and forgive me for being so dense.
No worries, I am actually going to make big friendly button for that, because people do miss it a lot. 🙂
Finished mine. Thank you for all your hard work.
I am so excited as Im slow as I need to read 2’s sometimes. I am very prouud as at 74++ Im quite proud. TY
Precioso trabajo, lamento no entender el idioma, cosa que para las explicaciones seria muy interesante entenderlas ,
I’d like to download this pattern but I can’t. I want to be able to work on this later.
There is a link at the bottom of the pattern for a printer friendly PDF on Craftsy.
Hello, I’m very new to crochet (only been doing it since October) and I stumbled on this page through a google search. I absolutely love this! Your blog is so helpful with showing new motifs that I haven’t tried yet. Thank you for sharing!
You’re welcome! Feel free to join my facebook group and ask questions. I know there are a lot of pattern link shares, but when people do speak up and ask something, there is usually a lot of help!
Hi I’m stuck on beginning in ( ) it says chain 12 which counts as 1st double crochet then chain 9? Am I chaining a total of 21? Or what do I do? Sorry very lost.
You chain 12. The first 3 of those are your starting chain that count as the first dc, the last 9 count as the ch 9. Just ch 12.
Thank you 🙂
Can you use size F hook and thin yarn
Sure, it will just be smaller.
If I keep going with the same concept from round four until I get a desired size for and afghan would there be a way to change it from a square to a rectangle with out loosing the design? Hopefully that made sense…
You could make it a rectangle, but you would want to start it as a rectangle.
I just found out about this CAL and was wanting to join. I tried to click were it says to so I could get a printer friendly version but the link did not work. Am I missing something or does the link no longer work? I really would like to try these squares. Thank you in advance for your help.
The link is working on my end. The printer friendly PDFs are on Craftsy. If you are not a member of Craftsy, you will have to sign up, but it is free. If you are a member but are not signed in, you may have to sign in.
Hey! I’m super late to the party and am just starting the CAL. I love the way this square looks and it’s been super fun making it. I’m at row 7 though and am trying to bust out the qtr stitches. I’m having loads of issues with the last loop on the hook being crazy loose once I finish the stitch. I’ve tried holding it in many different ways and trying to keep that stitch tight on my hook, loose on my hook, etc. I have no idea what I’m doing wrong or how to fix this! Any help would be appreciated! Thanks!
That happens a lot with longer stitches. Mainly you just have to try to be real loose when you start the yo, pull through 2s. If you are pulling them too tight, by the time you get to the last one, there is too much extra yarn.
Wow! I can’t thank you enough for your help and for getting back to me so quickly. Thank you so much! I really loved making this square, thanks for sharing it.
https://crochetophile.wordpress.com/2015/04/09/cal-block-01/
My experience with your cool pattern, all on my brand new blog! Thanks again for the pattern! 🙂
Thank you! The squares look wonderful.
I love your site with all the great patterns, ideas and tips. I’m also an Amazon “junkie” so I plan to start doing all my ordering from your website to help you out a bit!
Thanks so much, SuZ
Thank you so much! That really means a lot to me. I love knowing that people enjoy what I post, and my family and I truly appreciate when you shop from one of my links.
This square is so beautiful, I have never seen anything so lovely. I have been crocheting off and on for approx. 45 yrs. Maybe one day I will be able to crochet and read patterns better. I have been disabled now for 1 1/2 yrs now, and it is so hard to move. So I spend allot of my time crocheting. This past year finished off 5 afghans. Now I am doing another one with all shapes and sizes of granny squares. If I can figure your square out, a few of them will appear in my afghan. Thank You so much for sharing your work here for us all to learn from.
I found the pattern a bit intimidating for a new crocheter…so I got some help 🙂 Turned out beautiful. Thank you very much for a wonderful pattern. Newbie to crocheting and am having a blast. Working through the Moogly 2015 CAL.
Love this pattern after I finally understand it.
I’m glad you were able to figure it out. Intermediate level patterns are a challenge for newbies, so you should be very proud of yourself.
This is a really neat pattern. I used your link to shop on Amazon.com. Hope that helped a little. TY for posting this.
Thank you! Every little bit adds up and helps keep the blog going. <3