An update of a golden oldie, easier to make and an updated yarn suggestion.

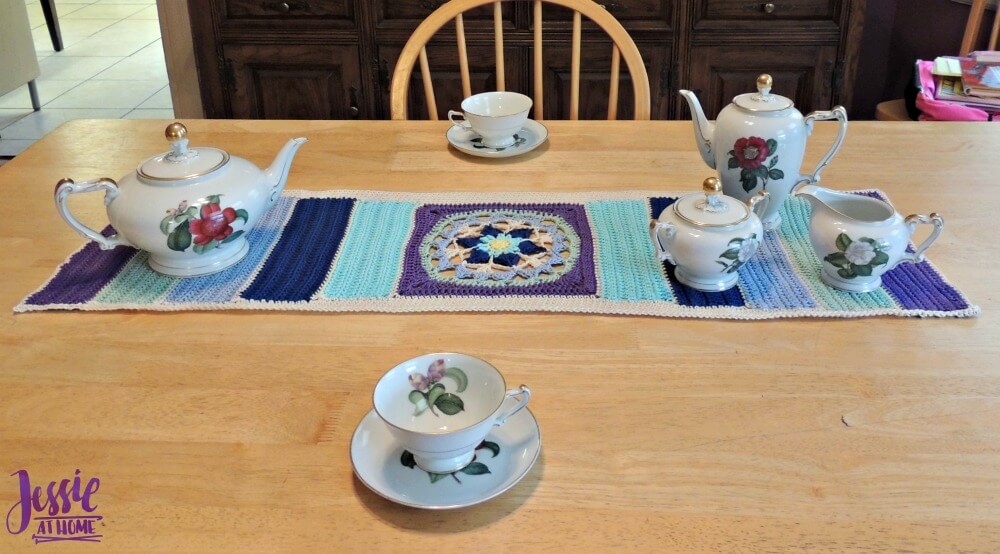
Flower Table Runner
Crochet Pattern
Intermediate Skill Level
Designed by Jessie Rayot
This was one of the first patterns I designed; I have updated it to make it easier to follow, and to use a yarn that is not discontinued. It was originally designed to take the place of a glass inset on a table at my friend’s tea shop. The ends can be made longer to make this a long table runner, or they can be kept as is for a short table runner or a table topper.

Size:
11″ x 37″
Yarn:
Lion Brand 24/7 in various colors – 250 g total
Hook:
US-G/6, 4.0mm
Gauge:
17 sts x 20 rows = 4” [10 cm] in sc
Other supplies:
yarn needle
Stitches and Abbreviations:
ch – chain
dc – double crochet
dc2tog – double crochet 2 together
dtr – double treble
hdc – half double crochet
sc – single crochet
sl st – slip stitch
sp(s) – space(s)
st(s) – stitch(es)
tr – treble crochet
Double Crochet Cluster (dc cl) – yo, insert hook in designated st, yo, pull back through st (3 loops on hook), yo and pull through 2 loops (2 loops left on hook) yo and insert hook in same st, yo, pull back through st (4 loops on hook), yo and pull through 2 loops (3 loops on hook), yo and pull through all 3 loops. Essentially you are making a dc decrease, but in only one st.
Picot Stitch (p) – ch 3, sl st into first ch made.
Getting Started:
To make the runner longer, add more repeats to the stripe sections, being sure to end on a dc row. To make it short, make less stripes or take away and even number of rows from the stripes.
Pattern:
Rnd 1: Ch 3, sl st in first ch to form a ring, ch 2 (counts as first hdc), 11 hdc in ring, join with a sl st to top chain of beginning ch 2. – {12 hdc}
Clip and fasten off yarn.
Rnd 2: Attach new color yarn by pulling through one of the hdc stitches, ch 2, dc in same stitch (this counts as your first dc cl), ch 1, (dc cl in next stitch, ch 1), 11 times, join with a sl st to top chain of beginning ch 2. – {12 dc cl}
Clip and fasten off yarn.
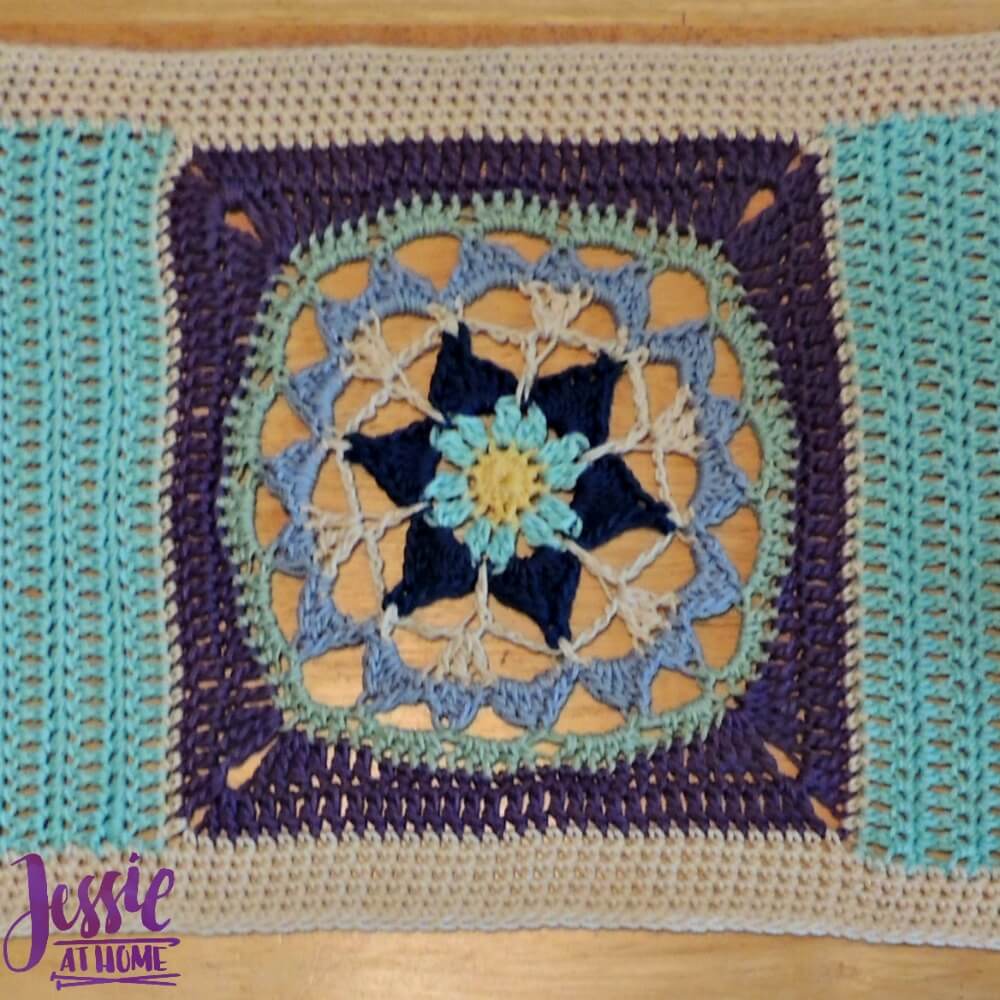
Rnd 3: Attach new color yarn by pulling through a ch sp, (3dc, tr, p, tr, 3dc) in next ch sp, * sl st in next sp, (3dc, tr, p, tr, 3dc) in next ch sp; repeat from * 5 more times, sl st in first ch sp. – {6 petals}
Clip and fasten off yarn.
Rnd 4: Attach new color yarn by pulling through one of the picots, (ch 4, dc into ch sp in rnd 2, ch 4, sl st into next picot) 6 times (last sl st will be in beginning st). – {6 dc}
DO NOT clip.
Rnd 5: [Ch 4, (dc, tr, dc) in next dc, ch 4, sl st into picot in rd 3] 6 times. – {6 sets of (dc, tr, dc)}
Clip and fasten off yarn.
Rnd 6: Attach new color yarn by pulling through sl st above a picot, sl st. [Ch, (sc, hdc, 2dc, hdc, sc) in ch-4 sp, ch, sl st in dc, 3 dc in tr, sl st in dc, (sc, hdc, 2 dc, hdc, sc) in ch-4 sp, ch, sl st in sl st above picot] 7 times. – {18 petals}
Clip and fasten off yarn.
Rnd 7: With next color, sl st in between the 2 dc just after the end of rd 6. [ch 4, hdc in center stitch of 3 dc, ch 4, sl st between 2 dc, ch 4, sl st between 2 dc] 6 times. DO NOT clip. – {18 sets of ch-4}
Rnd 8: Ch 2 (counts as first hdc) 4 hdc in ch-4 space, 5 hdc in each ch-4 sp around, sl st to top of beginning ch-2. – {90 hdc}
Clip and fasten off yarn.
Rnd 9: Attach new color yarn by pulling through next st, ch 5 (counts as first tr and ch-2), * 3 tr in same st, dc in each of next 3 sts, hdc in each of next 3 sts, sc in each of next 9 sts, hdc in each of next 3 sts, dc in each of next 3 sts, 3 tr in next st, ch 2, 3 tr in next st, dc in each of next 3 sts, hdc in each of next 3 sts, sc in each of next 9 sts, hdc in each of next 3 sts, dc in each of next 3 sts, ** 3 tr in next st; repeat from * to **, 2 tr in first st, sl st to 3rd ch to join, sl st into ch-2 sp. – {27 sts on each side and ch-2 on each corner}
DO NOT clip.
Rnd 10: Ch 4 (counts as first dc and ch 2), 2 dc in same ch-2 sp, [dc in each st to next ch-2 corner, (2 dc, ch 2, 2 dc) in ch-2 corner] 3 times, dc in each st to first ch-2 corner, dc in ch-2, sl st to 2nd ch of beginning ch-4. – {31 sts on each side and ch-2 on each corner}
Clip and fasten off yarn.
Rnd 11: Attach next color in any ch-2 sp, ch 3, sc in same ch-2 sp, [sc in each st to next ch-2 corner, (sc, ch 2, sc) in ch-2 corner] 3 times, sc in each st to first ch-2 corner, sc in ch-2, sl st to 2nd ch of beginning ch-3. – {33 sts on each side and ch-2 on each corner}
Clip and fasten off yarn.
First Stripe – Choose a top and a bottom. Start on the back side of the top
(basically as if you were starting the next round.)
Row 1: Attach new color yarn to ch-2 sp, ch 3 (counts as first dc), dc in each st to ch-2 sp, dc in ch-2 sp. – {35 dc}
Rows 2-6 even: Turn, ch 1 (does not count as st), sc in each st across.
Rows 3-7 odd: Turn, ch 3 (counts as first dc) dc in each st across
Repeat stripe on bottom, starting on the back side as well.
Rnd 12: Working from the front, attach new color yarn to top left corner of piece, ch, *3 sc in side of dc, 1 sc in side of each sc and 2 sc in side of each dc across stripe, sc in ch-2 sp, sc in each st to next ch-2 sp, sc in ch-2 sp, 2 sc in side of each dc and 1 sc in side of each sc across stripe, sc once more in last st, ch 2,** 2 sc in first st of bottom, sc in each st across bottom until 1 st remains, 2 sc in last st on bottom, ch 2; repeat from * to **, 2 sc in first st on top, sc in each st on top until 1 st remains, 2 sc in last st, ch 2, sl st to top of first sc. – {59 sc on sides, 37 sc on top and bottom, ch-2 on corners}
Clip and fasten off yarn.
Second Stripe – Start on back side of top.
Row 1: Attach new color yarn to ch-2 sp, ch 3 (counts as first dc), dc in each st to ch-2 sp, dc in ch-2 sp. – {39 dc}
Rows 2-6 even: Turn, ch 1 (does not count as st), sc in each st across.
Rows 3-7 odd: Turn, ch 3 (counts as first dc) dc in each st across
Repeat stripe on bottom, starting on the back side as well.
Rnd 13: Working from the front, attach new color yarn to top left corner of piece, ch, *3 sc in side of dc, 1 sc in side of each sc and 2 sc in side of each dc across stripe, sc in ch-2 sp, sc in each st to next ch-2 sp, sc in ch-2 sp, 2 sc in side of each dc and 1 sc in side of each sc across stripe, sc once more in last st, ch 2,** 2 sc in first st of bottom, sc in each st across bottom until 1 st remains, 2 sc in last st on bottom, ch 2; repeat from * to **, 2 sc in first st on top, sc in each st on top until 1 st remains, 2 sc in last st, ch 2, sl st to top of first sc. – {85 sc on sides, 41 sc on top and bottom, ch-2 on corners}
Clip and fasten off yarn.
Third Stripe – Start on back side of top.
Row 1: Attach new color yarn to ch-2 sp, ch 3 (counts as first dc), dc in each st to ch-2 sp, dc in ch-2 sp. – {43 dc}
Rows 2-6 even: Turn, ch 1 (does not count as st), sc in each st across.
Rows 3-7 odd: Turn, ch 3 (counts as first dc) dc in each st across
Repeat stripe on bottom, starting on the back side as well.
Rnd 14: Working from the front, attach new color yarn to top left corner of piece, ch, *3 sc in side of dc, 1 sc in side of each sc and 2 sc in side of each dc across stripe, sc in ch-2 sp, sc in each st to next ch-2 sp, sc in ch-2 sp, 2 sc in side of each dc and 1 sc in side of each sc across stripe, sc once more in last st, ch 2,** 2 sc in first st of bottom, sc in each st across bottom until 1 st remains, 2 sc in last st on bottom, ch 2; repeat from * to **, 2 sc in first st on top, sc in each st on top until 1 st remains, 2 sc in last st, ch 2, sl st to top of first sc. – {111 sc on sides, 45 sc on top and bottom, ch-2 on corners}
Clip and fasten off yarn.
Fourth Stripe – Start on back side of top.
Row 1: Attach new color yarn to ch-2 sp, ch 3 (counts as first dc), dc in each st to ch-2 sp, dc in ch-2 sp. – {47 dc}
Rows 2-6 even: Turn, ch 1 (does not count as st), sc in each st across.
Rows 3-7 odd: Turn, ch 3 (counts as first dc) dc in each st across
Repeat stripe on bottom, starting on the back side as well.
Rnd 15: Working from the front, attach new color yarn to top left corner of piece, ch, *3 sc in side of dc, 1 sc in side of each sc and 2 sc in side of each dc across stripe, sc in ch-2 sp, sc in each st to next ch-2 sp, sc in ch-2 sp, 2 sc in side of each dc and 1 sc in side of each sc across stripe, sc once more in last st, ch 2,** 2 sc in first st of bottom, sc in each st across bottom until 1 st remains, 2 sc in last st on bottom, ch 2; repeat from * to **, 2 sc in first st on top, sc in each st on top until 1 st remains, 2 sc in last st, ch 2, sl st to top of first sc. – {137 sc on sides, 49 sc on top and bottom, ch-2 on corners}
Clip and fasten off yarn.
Fifth Stripe – Start on back side of top.
Row 1: Attach new color yarn to ch-2 sp, ch 3 (counts as first dc), dc in each st to ch-2 sp, dc in ch-2 sp. – {51 dc}
Rows 2-6 even: Turn, ch 1 (does not count as st), sc in each st across.
Rows 3-7 odd: Turn, ch 3 (counts as first dc) dc in each st across
Repeat stripe on bottom, starting on the back side as well.
Rnd 16: Working from the front, attach new color yarn to top left corner of piece, ch, *3 sc in side of dc, 1 sc in side of each sc and 2 sc in side of each dc across stripe, sc in ch-2 sp, sc in each st to next ch-2 sp, sc in ch-2 sp, 2 sc in side of each dc and 1 sc in side of each sc across stripe, sc once more in last st, ch 2,** 2 sc in first st of bottom, sc in each st across bottom until 1 st remains, 2 sc in last st on bottom, ch 2; repeat from * to **, 2 sc in first st on top, sc in each st on top until 1 st remains, 2 sc in last st, ch 2, sl st to top of first sc. – {163 sc on sides, 53 sc on top and bottom, ch-2 on corners}
Clip and fasten off yarn.
Backing:
If you are making this piece washable, then wash it now, along with the backing fabric. This way if they are going to shrink different amounts it will happen before they are connected.
Cut a backing piece of fabric ¼ inch larger then the finished piece all around. Fold and press the edges of the fabric in ½ inch all around. This will make your backing ¼ inch smaller all around then your crocheted piece. Pin your backing fabric to the underside of your piece and hand stitch down.
Block piece – Sample used Unicorn Clean Fiber Wash for blocking
Use or give and enjoy!

If you enjoy what you have found here at JessieAtHome, please like my Facebook page to get all the updates on new tutorials, other posts, sales, and coming events.
If you have any questions or concerns, want to share pictures of your work, or just want to chat with Jessie and other crafty individuals, than join my Facebook group.
If you enjoy this free crochet pattern, please consider buying some of your supplies from one of these affiliate links. Thank you.

©Copyright 2017 Jessie Rayot / Jessie At Home All my videos, patterns, charts, photos and posts are my own work. Do not copy them in any way. If you want to share this information with someone, share the link to this post. If you want to share on your own blog / website, then you may use the first photo in this post and link back to this post. You may not give away printed copies of this post. Thank you.


Pretty